
If you’ve ever dreamed of making your own candy magic at home, this Homemade Marshmallows Recipe: 7 Steps to Pure Bliss Recipe is destined to become your new favorite indulgence. Soft, pillowy, and packed with just the right hint of vanilla, these marshmallows are remarkably simple yet wonderfully satisfying. There’s something truly special about whipping up your own batch from scratch—the texture, the freshness, and the chance to customize each bite make it worth every minute spent. Plus, these marshmallows are perfect for cozying up with a mug of hot cocoa, topping off desserts, or simply enjoying as a sweet treat all on their own.
Ingredients You’ll Need
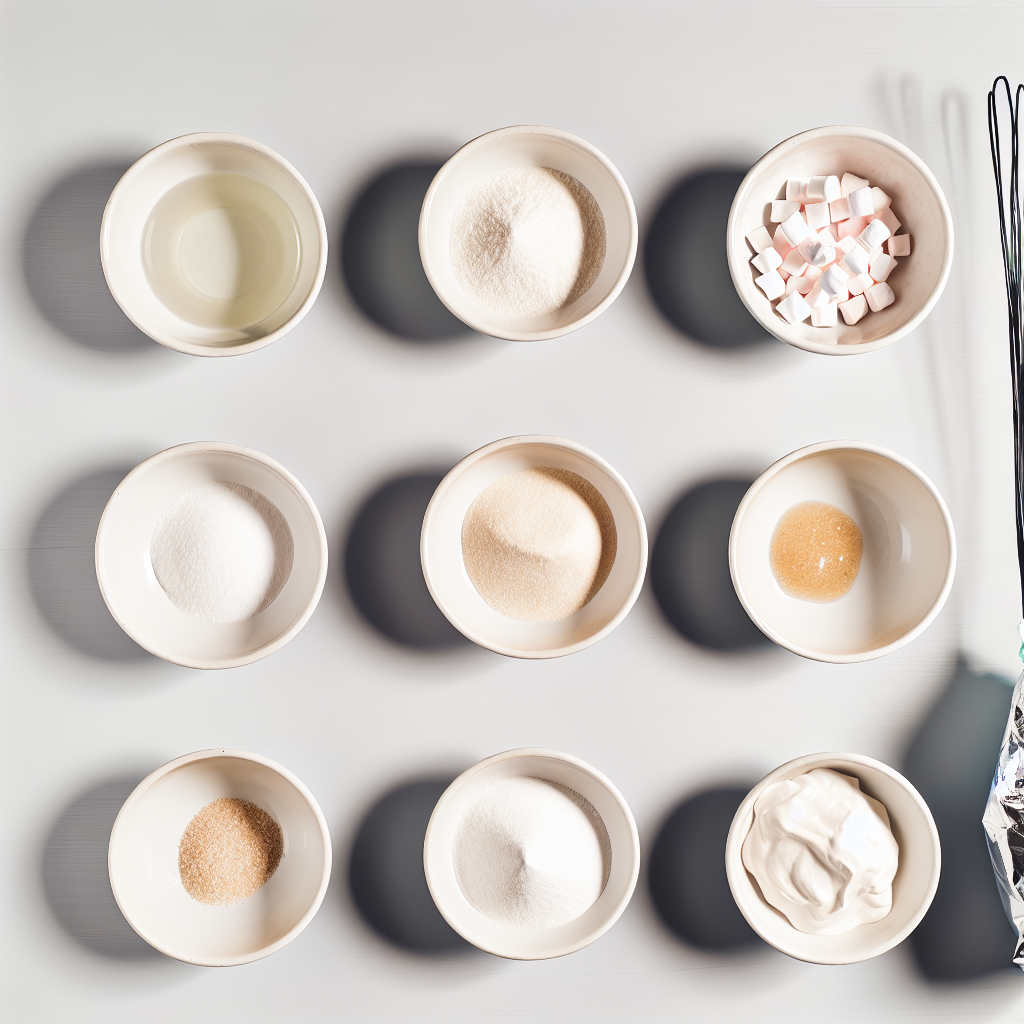
What’s fantastic about this Homemade Marshmallows Recipe: 7 Steps to Pure Bliss Recipe is that it relies on just a handful of straightforward ingredients, each playing a vital role in the final fluffy delight. From gelatin that gives structure to the mixture, to corn syrup that ensures perfect chewiness, every element matters.
- Unflavored gelatin (0.75 oz): This is the secret behind that bouncy, marshmallow texture you’ll adore.
- Room temperature water (1 cup, divided): Used to bloom the gelatin and dissolve the sugar mixture evenly.
- Granulated sugar (1 1/2 cups): Provides sweetness and works beautifully with the syrup to create body.
- Light corn syrup (1 cup): Adds sweetness while preventing crystallization for smooth marshmallows.
- Kosher salt (1/4 tsp): A tiny pinch to balance sweetness and bring out flavor.
- Pure vanilla extract (1 tbsp): Gives that comforting, classic marshmallow aroma and taste.
- Powdered sugar: For dusting to keep your marshmallows from sticking and to give a pretty finish.
How to Make Homemade Marshmallows Recipe: 7 Steps to Pure Bliss Recipe
Step 1: Bloom the Gelatin
Begin by combining the gelatin with half of the room temperature water in your stand mixer bowl fitted with the whisk attachment. Let it rest quietly for a few minutes until it swells and thickens—this “blooming” is crucial for the gelatin to dissolve properly and provide that perfect chewy texture later on.
Step 2: Prepare the Sugar Syrup
In a saucepan set over medium heat, stir together granulated sugar, light corn syrup, kosher salt, and the remaining water. Keep stirring until the sugar fully dissolves. Then crank up the heat a notch and let it cook without stirring until the syrup reaches 240°F (115°C) on your candy thermometer—this precise temperature sets the stage for those marshmallows to firm up just right.
Step 3: Combine and Whip
With your mixer on low speed, slowly drizzle the hot sugar syrup into the bloomed gelatin to avoid splatter. Once incorporated, turn the speed to high and whip this mixture until it becomes thick, glossy, and forms stiff peaks—this usually takes about 15 minutes. It’s quite a workout, but the transformation is mesmerizing!
Step 4: Add Vanilla and Mix
Now it’s time to infuse flavor: add your pure vanilla extract and mix briefly to combine. Don’t forget to scrape down the sides of your mixer bowl to catch every bit of fluffy goodness, ensuring uniform consistency and that heavenly aroma is fully incorporated.
Step 5: Prepare the Pan and Pour
Generously dust a 9×13 inch baking dish with powdered sugar to prevent sticking. Pour the whipped marshmallow mixture into the dish, spreading it out evenly, then dust the top with a bit of additional powdered sugar. This step ensures your marshmallows won’t stick and have a beautiful, classic finish.
Step 6: Let Marshmallows Set
Now the hardest part—waiting! Let your marshmallows sit uncovered at room temperature for at least 6 hours or, better yet, overnight. This resting period allows them to firm up perfectly without losing any of their signature softness.
Step 7: Cut and Coat
Flip your marshmallow slab onto a cutting board and dust the exposed side with powdered sugar to keep things non-sticky. Slice them into your favorite shapes using a sharp knife. Toss the pieces lightly in powdered sugar again to coat all sides—this keeps the marshmallows from sticking together and makes them ready to enjoy or gift.
How to Serve Homemade Marshmallows Recipe: 7 Steps to Pure Bliss Recipe
Garnishes
There are endless ways to dress up your marshmallows for serving. Try rolling them in finely crushed toasted coconut or a mix of cinnamon and sugar for a fun twist. You can even dip the ends in melted chocolate or sprinkle mini chocolate chips on top before they set for an elevated treat.
Side Dishes
Marshmallows are the perfect companion for wintery drinks like hot chocolate, coffee, or even warm cider. Serving your Homemade Marshmallows Recipe: 7 Steps to Pure Bliss Recipe alongside a rich, silky drink creates a cozy, sweet experience that’s sure to delight every guest.
Creative Ways to Present
Channel your inner party planner by skewering marshmallows with fresh fruit and drizzling with caramel or chocolate sauce for festive kabobs. Or, stack them between cake layers or on top of cupcakes as an inviting garnish that amps up both flavor and presentation.
Make Ahead and Storage
Storing Leftovers
If you’re lucky enough to have any leftover marshmallows after sharing, keep them fresh by storing in an airtight container at room temperature. Proper storage helps maintain softness and prevents them from becoming sticky or drying out.
Freezing
These marshmallows also freeze beautifully. Place them in a sealed container or zip-top bag and freeze for up to 3 months. When ready to enjoy, just thaw at room temperature—they’ll retain their delightful texture and flavor.
Reheating
While marshmallows are best enjoyed fresh or at room temperature, if you want to revive a slightly stale batch, gently warm them in a low-temperature oven (around 200°F/93°C) for a few minutes. Keep a close eye to prevent melting, and enjoy that softness once again.
FAQs
Can I make marshmallows without a stand mixer?
It’s possible but a bit tricky. The stand mixer’s power and whisk attachment are key for whipping the mixture into the right texture. If you don’t have one, be prepared for an arm workout using a hand mixer or whisk, and expect a longer whipping time.
Why do some marshmallows turn out sticky?
Sticky marshmallows usually mean there wasn’t enough powdered sugar dusting or that they were stored improperly in a humid environment. Make sure to coat each piece generously and keep them in a dry, airtight container.
Can I flavor my marshmallows with something other than vanilla?
Absolutely! Swap vanilla extract for fun options like peppermint, almond, or citrus extracts to customize your Homemade Marshmallows Recipe: 7 Steps to Pure Bliss Recipe and create unique flavors tailored to your taste.
How do I know when the sugar syrup is at the right temperature?
Using a candy thermometer is the most reliable method. For this recipe, you want the syrup to reach exactly 240°F (115°C), which is the soft-ball stage, essential for achieving the perfect marshmallow consistency.
Can I use flavored gelatin instead of unflavored?
It’s best to stick with unflavored gelatin here to control the flavor and sweetness precisely. Using flavored gelatin may alter the taste and color in ways that don’t suit this classic marshmallow recipe.
Final Thoughts
Making your own marshmallows might seem ambitious, but the Homemade Marshmallows Recipe: 7 Steps to Pure Bliss Recipe makes it totally achievable and thoroughly rewarding. Once you taste these soft, fragrant clouds of sweetness, you’ll wonder how you ever settled for store-bought. So go ahead, gather your ingredients, follow these steps, and treat yourself and your loved ones to a batch of homemade happiness that’s simply pure bliss.
Print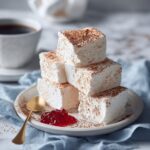
Homemade Marshmallows Recipe: 7 Steps to Pure Bliss Recipe
- Prep Time: 30 minutes
- Cook Time: 15 minutes
- Total Time: 6 hours 45 minutes
- Yield: 16 servings
- Category: Dessert
- Method: Stovetop
- Cuisine: American
Description
This Homemade Marshmallows recipe delivers fluffy, soft, and melt-in-your-mouth marshmallows made from scratch using gelatin, sugar, and vanilla. Perfect for snacking, adding to hot chocolate, or gifting, these marshmallows boast a glossy texture and sweet vanilla aroma.
Ingredients
Marshmallow Base
- 0.75 oz unflavored gelatin (3 packages)
- 1 cup room temperature water, divided
- 1 1/2 cups granulated sugar
- 1 cup light corn syrup
- 1/4 tsp kosher salt
- 1 tbsp pure vanilla extract
For Dusting
- Powdered sugar (as needed)
Instructions
- Bloom Gelatin: Combine the unflavored gelatin and 1/2 cup of room temperature water in the bowl of a stand mixer fitted with the whisk attachment. Let it sit undisturbed for a few minutes until the gelatin dissolves and thickens, forming a jelly-like consistency.
- Cook Sugar Syrup: In a medium saucepan over medium heat, mix granulated sugar, light corn syrup, kosher salt, and remaining 1/2 cup water. Stir continuously to dissolve sugar completely. Increase heat to medium-high and cook without stirring until the syrup reaches 240°F (115°C) on a candy thermometer. Immediately remove from heat to avoid overcooking.
- Combine and Whip: With the stand mixer on low speed, slowly pour the hot sugar syrup into the bloomed gelatin to avoid splashing. Once combined, increase the speed to high and whip until the mixture becomes very thick, glossy, and forms stiff peaks, approximately 15 minutes.
- Add Vanilla: Add pure vanilla extract and continue mixing briefly to incorporate fully. Use a spatula to scrape down the bowl sides to ensure uniform mixing.
- Prepare Pan and Pour: Generously dust a 9×13 inch baking dish with powdered sugar to prevent sticking. Pour the marshmallow mixture into the pan, spreading evenly. Dust the top with additional powdered sugar.
- Set Marshmallows: Allow marshmallows to rest uncovered at room temperature for at least 6 hours or preferably overnight to firm up and set completely.
- Cut and Store: Invert the baking dish onto a cutting board. Dust top with more powdered sugar to minimize stickiness. Slice into desired shapes with a sharp knife and toss cut pieces in powdered sugar to coat all sides. Store in an airtight container at room temperature to maintain freshness.
Notes
- Make sure to use a candy thermometer for precise syrup temperature to ensure perfect texture.
- Use a stand mixer with a whisk attachment to achieve the best whipping results and thickness.
- Dusting the pan and marshmallows heavily with powdered sugar prevents sticking.
- Store marshmallows in an airtight container to keep them soft and fresh up to two weeks.
- For flavored variations, consider adding different extracts or food coloring during the vanilla addition step.
