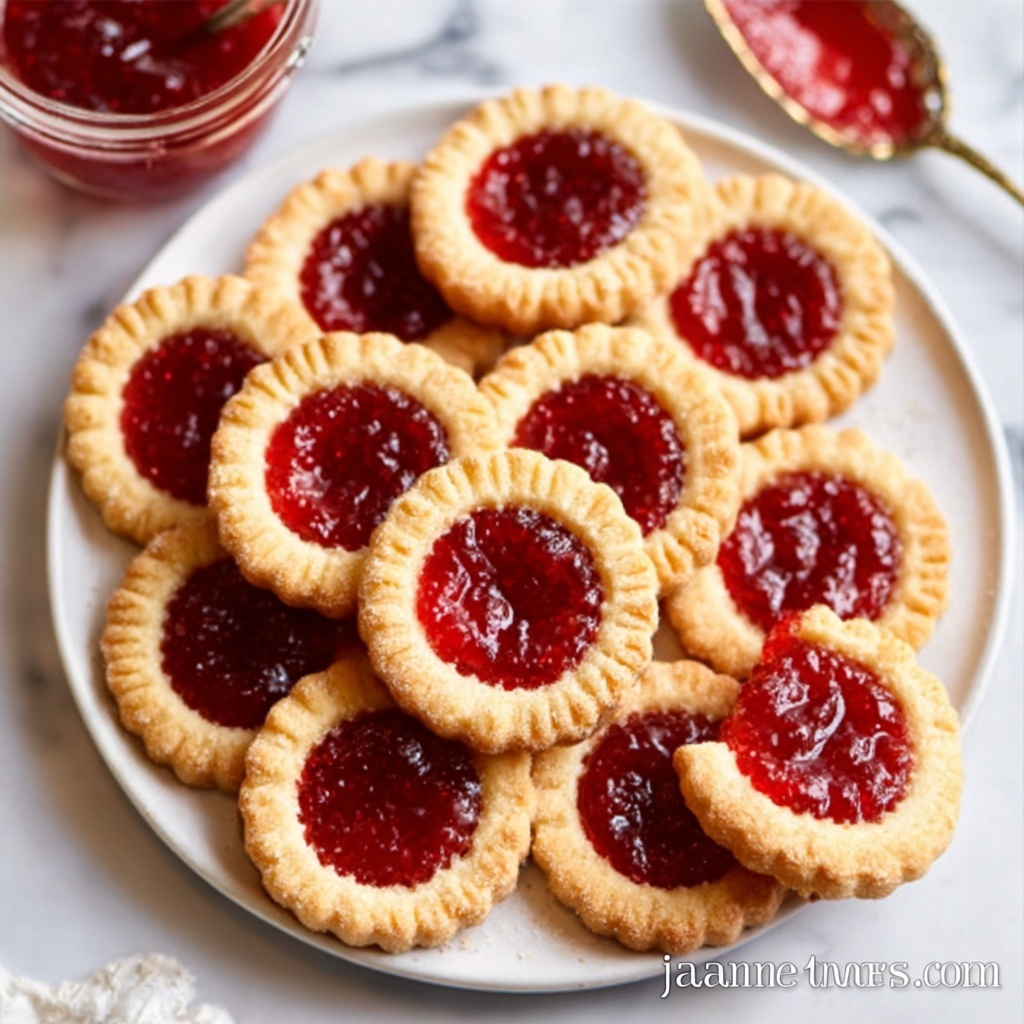
If you’ve ever dreamed of a delightfully simple yet utterly scrumptious treat, this Classic Jam-Filled Tarts Recipe is exactly what you need. With its buttery, flaky pastry hugging a luscious burst of your favourite jam, these tarts strike that perfect balance between sweet nostalgia and easy elegance. Whether you’re baking for a tea party, a cozy family gathering, or just an everyday indulgence, these charming little tarts bring joy to every bite and create smiles all around the table.

Ingredients You’ll Need
The magic of the Classic Jam-Filled Tarts Recipe lies in its straightforward ingredients, each playing a crucial role. From the tender, crumbly texture of the pastry to the vibrant sweetness of the jam, every component is essential in crafting the perfect bite-sized delight.
- 250 g plain all-purpose flour: The base of your pastry, providing structure and tenderness.
- 125 g dairy-free margarine: Adds buttery richness while keeping the pastry light and flaky.
- 75 g cold water (approximately): Helps bind the dough gently without toughening it.
- 400 g jam (any flavour): The star filling that brings a burst of fruity sweetness and vibrant color.
How to Make Classic Jam-Filled Tarts Recipe
Step 1: Preheat the Oven
Start by heating your oven to 200°C (Fan 180°C) / 400°F / Gas Mark 6. Getting the oven ready upfront means your tarts will bake evenly and develop that perfect golden crust that everyone loves.
Step 2: Prepare the Pastry
In a large bowl, mix the flour with the dairy-free margarine using your fingertips until you achieve fine breadcrumbs. This technique is key for a delicate, flaky texture. Then, slowly add the cold water, stirring gently with a table knife rather than kneading, which keeps the dough soft and tender. Once smooth, pop the dough in the fridge for 10 minutes to rest — this little pause helps the pastry roll out beautifully.
Step 3: Roll and Cut the Pastry
Lightly flour your surface and roll the dough to about ½ cm thickness. Use a 9 cm round cutter or a glass to cut out 12 circles. Don’t worry if some edges get uneven — just gather the scraps and roll again to make the most of every bit of dough.
Step 4: Fill the Tart Shells
Line each pastry circle into a muffin tin, gently pressing to form shallow little bowls. Spoon the jam evenly into each shell, being careful not to overfill so the jam doesn’t bubble out during baking. This step is where you can get creative with your favorite jam flavors!
Step 5: Bake
Bake the tarts for 15 minutes or until the pastry turns a lovely light golden color and the jam looks glossy and melted. Once out of the oven, let them cool completely — the jam will be piping hot, and patience here rewards you with perfect, safe-to-eat tarts.
How to Serve Classic Jam-Filled Tarts Recipe
Garnishes
A light dusting of powdered sugar is a simple yet elegant way to finish your jam-filled tarts, adding a snow-kissed charm. For an extra flourish, fresh mint leaves or a dollop of dairy-free whipped cream make these treats even more inviting.
Side Dishes
These tarts pair beautifully with a warm cup of tea or coffee, making them ideal for afternoon tea or casual brunches. A fresh fruit salad on the side can complement the fruity jam and balance the sweetness, making your spread feel fresh and vibrant.
Creative Ways to Present
If you want to wow your guests, try serving your tarts on a rustic wooden board or a delicate cake stand with edible flower petals sprinkled around. You can also experiment with layering multiple jam flavours in the shells for a colorful surprise that’s as beautiful as it is delicious.
Make Ahead and Storage
Storing Leftovers
Once cooled, store any leftover tarts in an airtight container at room temperature for up to two days. This keeps the pastry crisp and the jam fresh, ready for a quick sweet fix the next day.
Freezing
You can freeze your Classic Jam-Filled Tarts Recipe to enjoy later by wrapping them individually in plastic wrap and placing them in a freezer bag. They keep well for up to a month, making them a fantastic make-ahead treat for busy days or unexpected guests.
Reheating
To reheat, simply warm the tarts in a preheated oven at 160°C (320°F) for about 5–7 minutes. This revives the crispiness of the pastry without drying out the jam, giving you that just-baked goodness every time.
FAQs
Can I use any type of jam in the Classic Jam-Filled Tarts Recipe?
Absolutely! One of the joys of this recipe is its versatility. Feel free to use strawberry, raspberry, apricot, or even exotic jams like mango or blueberry. Just make sure the jam isn’t too watery to avoid soggy pastry.
Is it necessary to use dairy-free margarine?
You can substitute dairy-free margarine with regular butter if you prefer. The recipe’s texture and flavor will stay wonderful either way, though dairy-free options are great if you’re catering to dietary restrictions.
How thick should I roll out the pastry?
Rolling your dough to about ½ cm thickness is ideal. It’s thick enough to hold the jam without breaking and thin enough to bake into a light, tender crust.
Why do I need to rest the dough in the fridge?
Resting chills the margarine and relaxes the gluten in the flour, making the dough easier to roll and preventing shrinkage during baking. It’s a small step that makes a big difference in your tart shells.
Can I make the pastry in advance?
Yes! You can prepare the pastry a day ahead, wrap it tightly, and keep it refrigerated until ready to use. This helps if you want to divide your baking over two days or prepare in advance for a special occasion.
Final Thoughts
There’s something incredibly satisfying about pulling freshly baked Classic Jam-Filled Tarts Recipe from the oven – the golden crust, the sweet smell of jam warming the kitchen, and that first bite that brings a smile. This recipe is a wonderful way to create moments of homemade joy, whether for yourself or to share with loved ones. I truly hope you try making these charming little treats and bring some sweet, simple happiness into your day.
Print
Classic Jam-Filled Tarts Recipe
- Prep Time: 15 minutes
- Cook Time: 15 minutes
- Total Time: 35 minutes
- Yield: 12 tarts
- Category: Baking
- Method: Baking
- Cuisine: British
- Diet: Vegan
Description
These Classic Jam-Filled Tarts are a delightful treat featuring a crisp, buttery dairy-free pastry filled with sweet, melted jam. Perfect for tea time or a light dessert, these tarts combine simplicity with delicious flavor and are easy to prepare with common pantry ingredients.
Ingredients
Pastry
- 250 g plain all-purpose flour
- 125 g dairy-free margarine
- 75 g cold water (approximately)
Filling
- 400 g jam (any flavour)
Instructions
- Preheat the Oven: Preheat your oven to 200°C (Fan 180°C) / 400°F / Gas Mark 6 to ensure it reaches the right temperature while you prepare the pastry.
- Prepare the Pastry: In a large mixing bowl, combine the flour and dairy-free margarine. Use your fingertips to rub them together until the mixture looks like fine breadcrumbs. Gradually add the cold water little by little, mixing gently with a table knife after each addition. Avoid kneading; instead, cut through the mixture to keep the pastry tender. Once you have a soft, smooth dough ball, wrap it and chill in the refrigerator for 10 minutes.
- Roll and Cut the Pastry: Remove the dough from the fridge and roll it out on a lightly floured surface to about ½ cm thickness. Use a 9 cm round pastry cutter or a similarly sized glass to cut out 12 circles. Re-roll any scraps as needed to get all 12.
- Fill the Tart Shells: Place each pastry circle into a muffin tin, pressing gently to form shallow tart shells. Spoon the jam evenly into each shell, being careful not to overfill, as the jam will expand during baking.
- Bake: Bake the tarts for about 15 minutes until the pastry edges turn lightly golden and the jam bubbles and melts. Remove from the oven and let them cool completely in the tin before removing, as the jam will be very hot right after baking.
Notes
- Using cold water helps keep the margarine firm for a flakier pastry.
- You can customize the filling with any flavor of jam you prefer, such as raspberry, strawberry, or apricot.
- Be careful not to overfill the tart shells to prevent jam from spilling over during baking.
- Allow tarts to cool fully before serving for safer handling and best texture.
- For a richer tart, consider brushing the pastry edges with a dairy-free milk alternative before baking to promote browning.

