
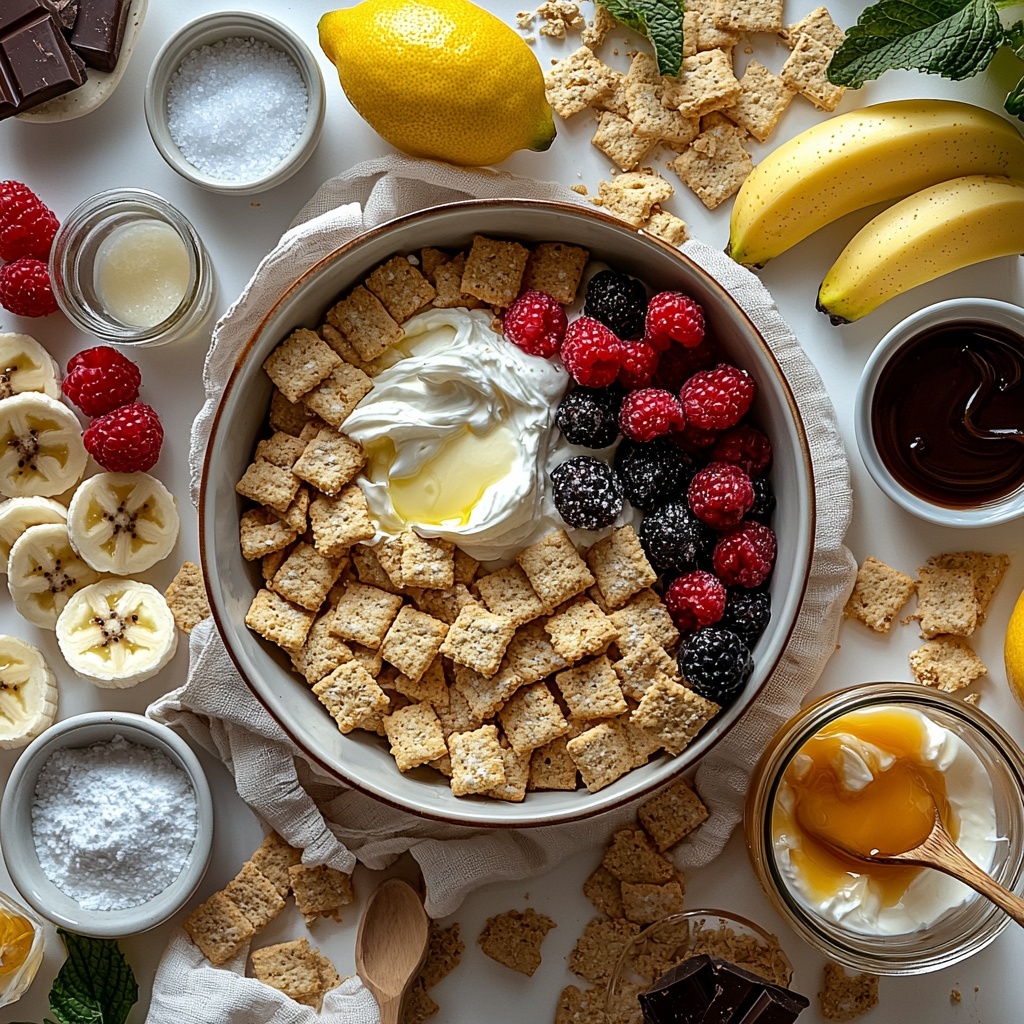
If you’re dreaming of a dessert that’s effortlessly delightful and bursting with creamy goodness, then you’re going to love this No Bake Creamy Graham Cracker Pie with Fresh Toppings Recipe. It combines a buttery graham cracker crust with a luscious, smooth filling that sets beautifully without ever heating up the oven. Perfect for warm days or last-minute gatherings, this pie invites you to customize it with your favorite fresh toppings, making every bite a burst of flavor and texture. Trust me, once you try this dreamy treat, it will become your go-to dessert for impressing friends, family, or just indulging yourself.
Ingredients You’ll Need
Preparing this No Bake Creamy Graham Cracker Pie with Fresh Toppings Recipe is wonderfully simple because it relies on humble yet essential ingredients that each bring something special to the table—whether it’s richness, sweetness, or that irresistible graham cracker crunch.
- Graham crackers (about 10–12 full sheets or 1 1/2 cups crumbs): The soul of the crust, these add a slightly sweet, nutty flavor and perfect crunch.
- Unsalted butter (6 tablespoons), melted: Binds the crust crumbs together and adds a silky richness without overpowering.
- Granulated sugar (2 tablespoons) for the crust: Just a touch of sweetness to balance the buttery crumbs perfectly.
- Cream cheese (16 ounces), softened: The foundation of the creamy filling, lending tanginess and a velvety texture.
- Powdered sugar (3/4 to 1 cup), to taste: Sweetens the filling smoothly without any graininess.
- Pure vanilla extract (1 to 2 teaspoons): A warm, fragrant note that elevates every spoonful.
- Heavy whipping cream (1 cup), cold: Whipped to fluffy perfection to lighten up the filling magnificently.
- Lemon juice (1 to 2 tablespoons) for brightness (optional): Adds a subtle zing that cuts through the richness beautifully.
- Pinch of salt to balance sweetness: Highlights all the flavors and keeps the pie interesting.
- Toppings of your choice: Fresh berries, sliced bananas, chocolate shavings, caramel sauce, crushed cookies, or pie fillings like cherry or blueberry to add a personal touch.
How to Make No Bake Creamy Graham Cracker Pie with Fresh Toppings Recipe
Step 1: Make the Crust
Start by crushing your graham crackers until you have about 1 1/2 cups of fine crumbs. You can use a food processor or place them in a zip-top bag and crush with a rolling pin if you want a fun, hands-on method. This crumb base is essential because it provides the firm yet tender foundation for your pie, so aim for an even crumb size that will pack nicely.
Step 2: Combine Crumbs and Butter
Mix together the graham cracker crumbs, melted butter, and granulated sugar until the mixture resembles wet sand and stays together when pressed. This step ensures your crust will hold in the pie dish without crumbling apart later, creating that satisfying crunch with every bite.
Step 3: Press Into the Pan
Pour your crust mixture into a 9-inch pie dish and press firmly, pushing the crumbs up the sides as well. Using the bottom of a measuring cup helps pack it tightly and evenly, resulting in a neat, sturdy crust that’s ready to hold all that creamy goodness.
Step 4: Chill the Crust
Pop the crust into the refrigerator for at least 20 to 30 minutes. Chilling is crucial because it solidifies the crust so it won’t crumble when you slice the pie later. This little pause also gives you time to prepare the luscious filling.
Step 5: Whip the Cream
In a chilled bowl, beat the heavy whipping cream until stiff peaks form. This fluffy whipped cream is what will give your filling its light, airy texture, making every bite feel like a cloud of creamy delight.
Step 6: Beat the Cream Cheese
In a separate bowl, beat the softened cream cheese until completely smooth and silky. Take your time here, scraping the sides as you go, because a lump-free base is key to that ultra-creamy finish everyone will rave about.
Step 7: Sweeten and Flavor
Add the powdered sugar, vanilla extract, a pinch of salt, and optional lemon juice to the cream cheese and beat until the mixture is light and fluffy. This combination creates the perfect balance of sweetness and tang with a hint of brightness that makes each spoonful irresistible.
Step 8: Fold in Whipped Cream
Gently fold the whipped cream into the cream cheese mixture in two additions. Be careful to maintain the airiness by folding gently rather than stirring vigorously—this keeps the filling light and luscious rather than dense.
Step 9: Fill the Crust
Spoon the creamy filling into your chilled crust and smooth the top with a spatula. Give the pie a gentle tap on the counter to settle the filling evenly and eliminate any air bubbles, setting the scene for a flawless texture.
Step 10: Chill to Set
Cover the pie and refrigerate for at least 4 hours, preferably overnight. This chill time allows the flavors to meld and the texture to firm up beautifully, so your slices hold perfectly when cut and serve like a dream.
Step 11: Add Toppings
Right before serving, bring out your favorite fresh toppings to decorate your pie. Whether it’s vibrant berries, silky sliced bananas, chocolate shavings, or a drizzle of caramel, these toppings add texture, color, and bursts of complementary flavor that take this pie into show-stopper territory.
Step 12: Slice and Serve
Use a sharp knife to slice the pie neatly, wiping the blade between cuts for those clean edges. Serve cold, and watch as everyone falls in love bite after bite with this stunning No Bake Creamy Graham Cracker Pie with Fresh Toppings Recipe.
How to Serve No Bake Creamy Graham Cracker Pie with Fresh Toppings Recipe
Garnishes
Adding thoughtful garnishes really elevates this pie. Fresh berries, like blueberries or raspberries, provide not only a gorgeous pop of color but a tart contrast to the sweet creaminess. Alternatively, chocolate shavings or toasted coconut flakes bring texture and richness. A light dusting of powdered sugar or a drizzle of caramel sauce also serves beautifully as a finishing touch.
Side Dishes
This pie pairs wonderfully with simple side dishes that balance richness. A crisp green salad with a citrus vinaigrette or a bowl of fresh seasonal fruit complements the creamy, indulgent flavor without overwhelming it. If you’re serving coffee or tea, a nutty biscotti or almond cookies would be an excellent accompaniment.
Creative Ways to Present
For an eye-catching presentation, try making individual no bake cream pies in small mason jars or mini tart pans topped with a swirl of whipped cream and fresh toppings. You could also create a pie bar with assorted toppings for guests to customize their slices. Serving the pie with a scoop of complementary ice cream or a spoonful of compote can transform this dessert into an unforgettable experience.
Make Ahead and Storage
Storing Leftovers
Leftover pie should be covered tightly with plastic wrap or stored in an airtight container in the refrigerator. It will stay fresh and creamy for up to 3 days. Keep in mind the crust may soften slightly over time but will still taste fantastic.
Freezing
You can freeze this pie for longer storage by wrapping it securely with plastic wrap and aluminum foil. Freeze for up to 1 month. When ready to enjoy, thaw overnight in the refrigerator for best texture and flavor retention.
Reheating
This dessert is designed to be served cold, so reheating is not recommended. Instead, remove it from the fridge a few minutes before serving to take the chill off slightly for maximum creamy enjoyment.
FAQs
Can I use a store-bought graham cracker crust for this pie?
Absolutely! A pre-made crust can save time and still taste delicious. Just make sure it’s fresh and firm for the best results. Then follow the same filling and topping steps as usual.
What if I don’t have cream cheese?
Cream cheese is key for the signature creamy tang of this pie. While substitutions like mascarpone or ricotta are possible, they will alter the flavor and texture. For the most authentic experience, cream cheese is your best bet.
Can I make this pie vegan or dairy-free?
To make a vegan or dairy-free version, you can try vegan cream cheese and coconut whipped cream alternatives. The crust can stay the same if the butter is replaced with a plant-based alternative, but texture and flavor might shift slightly.
How long does it take for the pie to set?
The pie needs at least 4 hours to chill and set properly, though overnight is ideal for the best texture and clean slicing. This resting time lets the filling thicken and flavors meld beautifully.
What are the best fresh toppings to use?
Fresh berries like strawberries, blueberries, and raspberries are classic favorites that add color and brightness. Sliced bananas, chopped nuts, chocolate shavings, or even a drizzle of warm caramel or fruit pie filling also make stunning and delicious choices.
Final Thoughts
Making the No Bake Creamy Graham Cracker Pie with Fresh Toppings Recipe is like treating yourself and your loved ones to a slice of happiness that’s creamy, crunchy, and endlessly customizable. It’s simple enough to whip up anytime but impressively elegant for special occasions. I can’t wait for you to give it a try and share that moment when the first forkful melts in your mouth — pure comfort and joy. Happy baking-free baking!
Print
No Bake Creamy Graham Cracker Pie with Fresh Toppings Recipe
- Prep Time: 30 minutes
- Cook Time: 0 minutes
- Total Time: 4 hours 30 minutes
- Yield: 8 servings
- Category: Dessert
- Method: No-Cook
- Cuisine: American
Description
This no-bake pie recipe features a crunchy graham cracker crust and a smooth, creamy filling made from cream cheese and whipped cream. Easy to make and perfect for any occasion, these pies are chilled to set and topped with your choice of fresh fruits or sweet sauces for a delightful, crowd-pleasing dessert that requires no oven time.
Ingredients
Crust
- 10–12 full sheets graham crackers (about 1 1/2 cups crumbs)
- 6 tablespoons unsalted butter, melted
- 2 tablespoons granulated sugar
Filling
- 16 ounces cream cheese, softened
- 3/4 to 1 cup powdered sugar, to taste
- 1 to 2 teaspoons pure vanilla extract
- 1 cup heavy whipping cream, cold
- 1 to 2 tablespoons lemon juice (optional)
- Pinch of salt
Toppings (Optional)
- Fresh berries
- Sliced bananas
- Chocolate shavings
- Caramel sauce
- Crushed cookies
- Pie filling such as cherry or blueberry
Instructions
- Make the crust: Crush the graham crackers into fine crumbs using a food processor or by placing them in a zip-top bag and rolling with a pin until you have about 1 1/2 cups of crumbs.
- Combine crumbs and butter: In a mixing bowl, stir together the graham cracker crumbs, melted butter, and granulated sugar until the mixture resembles wet sand and holds together when pressed.
- Press into the pan: Firmly press the crumb mixture into a 9-inch pie dish, ensuring it goes up the sides. Use the bottom of a measuring cup to pack the crust tightly for stability.
- Chill the crust: Refrigerate the crust for at least 20 to 30 minutes to firm it up and prevent crumbling when sliced.
- Whip the cream: In a chilled bowl, beat the cold heavy whipping cream until stiff peaks form. Set aside for folding later.
- Beat the cream cheese: In a separate bowl, beat the softened cream cheese until smooth and silky with no lumps, scraping the bowl as needed.
- Sweeten and flavor: Add powdered sugar, vanilla extract, a pinch of salt, and optional lemon juice to the cream cheese. Beat the mixture until light and creamy.
- Fold in whipped cream: Gently fold the whipped cream into the cream cheese mixture in two portions, maintaining the airy texture without overmixing.
- Fill the crust: Spoon the creamy filling into the chilled crust and smooth the surface with a spatula. Tap the pie on the counter gently to settle the mixture evenly.
- Chill to set: Cover the pie and refrigerate for at least 4 hours, preferably overnight, to allow the filling to set and the flavors to meld.
- Add toppings: Just before serving, decorate the pie with your preferred toppings such as fresh berries, chocolate drizzle, or pie filling for extra flavor and presentation.
- Slice and serve: Use a sharp knife to cut neat slices, wiping the knife clean between cuts. Serve the pie chilled for best texture and taste.
Notes
- For a firmer crust, substitute half the butter with melted coconut oil.
- The lemon juice is optional but adds a bright flavor contrast to the sweet filling.
- Cover the pie tightly when chilling to prevent it from absorbing fridge odors.
- If you prefer a sweeter filling, adjust the powdered sugar to your taste.
- Leftover pie can be stored covered in the refrigerator for up to 3 days.


