
“`html
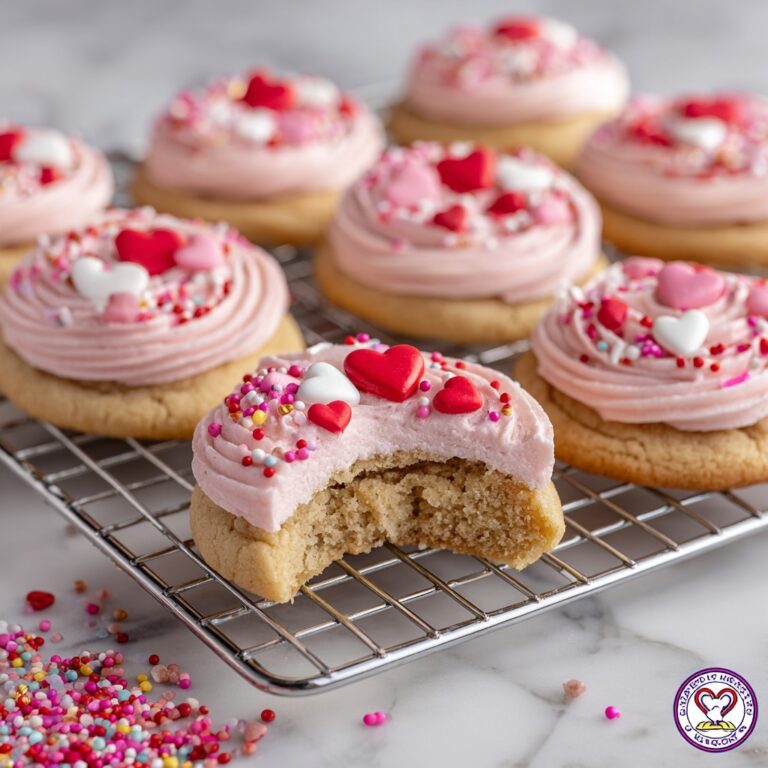
If you are looking for a delightful treat that not only tastes heavenly but also looks absolutely adorable, this Heart-Shaped Strawberry Shortbread Cookies Recipe is exactly what you need. These charming cookies combine buttery, melt-in-your-mouth shortbread with the bright, fresh flavor of strawberries through a luscious glaze and jam filling, making them the perfect sweet to share with loved ones or to enjoy as a special everyday indulgence.
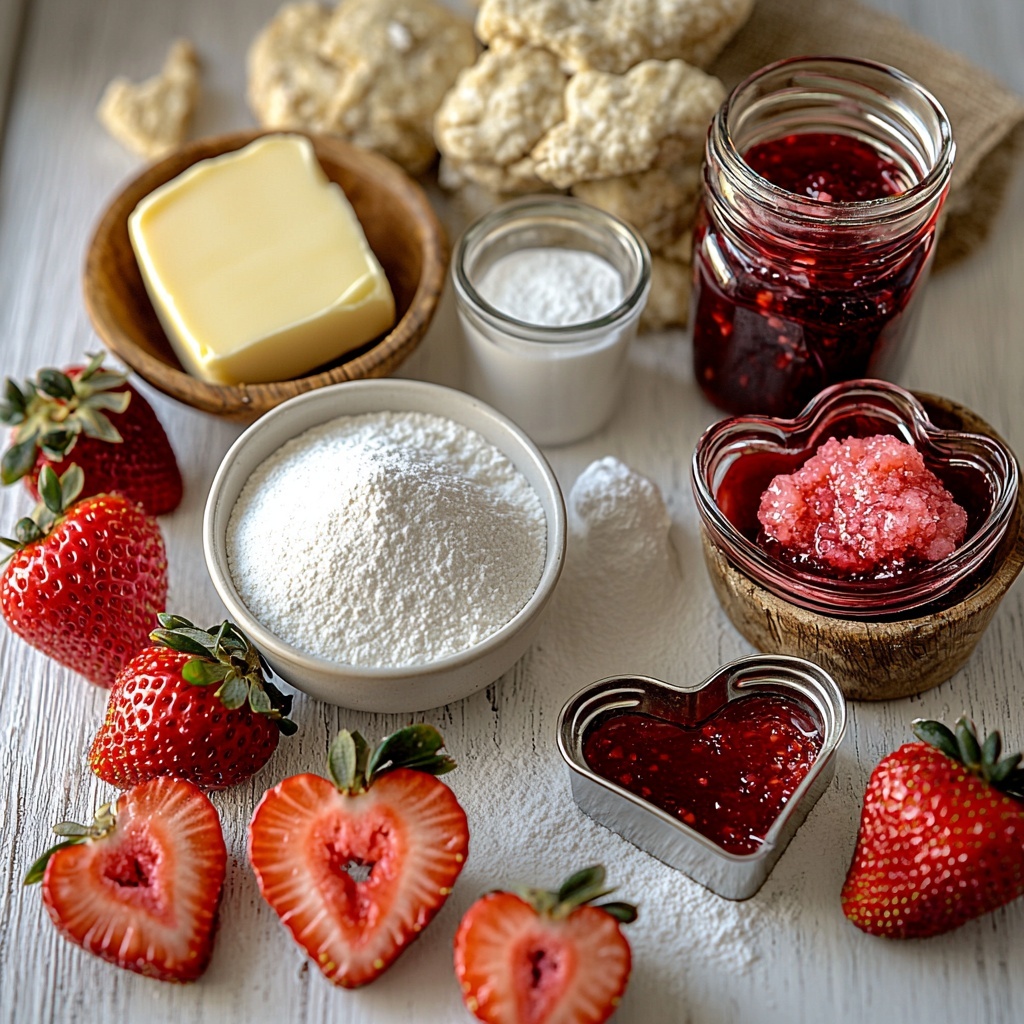
Ingredients You’ll Need
The magic of this Heart-Shaped Strawberry Shortbread Cookies Recipe lies in its simple yet carefully chosen ingredients. Each one plays a key role in creating the perfect balance of texture, flavor, and that lovely pinkish hue that makes these treats so irresistible.
- Unsalted butter (125 g): The foundation of classic shortbread, butter creates the rich, tender crumb and buttery depth.
- Caster sugar (60 g): Gives sweetness while helping achieve just the right texture.
- Vanilla extract (1 teaspoon): Adds warmth and a subtle aromatic note to enhance the overall flavor.
- Plain flour (180 g): Provides structure and that melt-away convenience we love in shortbread.
- Fine salt (¼ teaspoon): Balances sweetness and brightens the flavors.
- Powdered icing sugar (110 g): For a smooth, glossy glaze that tastes sweet but light.
- Strawberry puree (2 tablespoons): Made from fresh strawberries, this gives your glaze a natural fruity color and tang.
- Melted unsalted butter (1 teaspoon): Enriches the glaze for that perfect mouthfeel.
- Milk (30 ml): Used sparingly to perfect glaze consistency without making it runny.
- Strawberry jam (170 g): The scrumptious filling that ties the cookies together with bursts of sweet, fruity flavor.
How to Make Heart-Shaped Strawberry Shortbread Cookies Recipe
Step 1: Cream the Butter and Sugar
Start by creaming together room-temperature unsalted butter, caster sugar, and vanilla extract using an electric mixer. You’ll want to beat this mixture for 2 to 3 minutes on medium speed until it looks pale and light. Scrape down the bowl at least once to make sure everything is evenly mixed. This step is crucial as it sets the texture and fluffiness of your cookie dough.
Step 2: Combine Flour and Salt
Next, sift in the plain flour and add the fine salt to the bowl. Mix on low speed just until the ingredients come together, forming ragged clumps and cleaning the sides of the bowl. Don’t overmix—once the dough forms, press it gently into a rough disc by hand. This helps keep the dough tender and ensures your cookies will have that perfect crumbly texture.
Step 3: Roll Out the Dough
Dust your work surface lightly with flour and roll the dough out to about ½ cm (¼ inch) thickness. If you feel the dough is too soft and sticky, wrap it in cling film and pop it into the fridge for 10 to 15 minutes. This chilling step makes rolling easier and prevents cracking, so your heart shapes come out crisp and perfect.
Step 4: Cut and Chill Cookies
Grab your favorite heart-shaped cookie cutter and start stamping out cookies from the rolled dough. Place the cutouts onto parchment-lined baking trays. Don’t throw away the leftover scraps; gently re-roll those with a sprinkle of water if needed. Once all shapes are cut, refrigerate the cookie trays for at least 30 minutes. This resting time firms up the dough, helping the cookies retain their pretty heart shape during baking.
Step 5: Bake the Cookies
Preheat your oven to 170°C (335°F) and bake the chilled cookies for 10 to 12 minutes. Watch for a light golden edge forming, signaling that they’re perfectly baked. After baking, let the cookies cool in the tray for 10 minutes, then transfer them to a wire rack to cool completely. Cooling fully is important before you start glazing and assembling to avoid melting or smudging the icing.
Step 6: Prepare the Strawberry Glaze
In a small bowl, whisk together powdered icing sugar, fresh strawberry puree, and melted butter until smooth and lump-free. If the mixture feels too thick, warm it gently in the microwave for 5 to 10 seconds or stir in tiny amounts of milk until you reach a spreading consistency that coats the back of a spoon effortlessly.
Step 7: Glaze the Cookies
Separate your cooled cookies into equal amounts of tops and bases. Dip the cookie tops into the luscious strawberry glaze, allowing the extra to drip off. Place the glazed cookies on a wire rack or parchment paper-lined tray where they can set beautifully without sticking, forming that irresistible glossy finish.
Step 8: Assemble the Cookies
Finally, take the cookie bases and spoon or pipe about a teaspoon of strawberry jam onto each one. Sandwich them with the glazed tops, pressing lightly so they stick together without squeezing out the jam. You can serve these delightful Heart-Shaped Strawberry Shortbread Cookies Recipe creations immediately, or let them rest at room temperature so the glaze and jam join forces to become perfectly set.
How to Serve Heart-Shaped Strawberry Shortbread Cookies Recipe
Garnishes
Adding simple garnishes can elevate the charm of these cookies. Consider sprinkling a tiny pinch of edible glitter or a few finely chopped freeze-dried strawberries on the glaze before it sets for a subtle pop of texture and color. Fresh mint leaves on the side add an aromatic freshness that complements the sweetness.
Side Dishes
These cookies go wonderfully with a cup of tea or a delicate coffee. For a more indulgent treat, serve alongside vanilla ice cream or fresh berries, which highlight the strawberry notes perfectly. They also make a charming dessert paired with a light mascarpone cream for an elegant touch.
Creative Ways to Present
If you’re sharing these Heart-Shaped Strawberry Shortbread Cookies Recipe treats, consider stacking them in cute glass jars tied with ribbon or arranging them on a pretty platter with a scattering of fresh strawberries and edible flowers. For parties, create dessert boxes or favor bags that highlight their heart shape and vibrant glaze—a guaranteed crowd-pleaser!
Make Ahead and Storage
Storing Leftovers
Your cookies will keep well in an airtight container at room temperature for up to 4 days. Keep them separated by layers of parchment paper to avoid sticking or smudging the glaze. This way, their buttery crispness and sweet strawberry flavors remain fresh.
Freezing
If you want to stash some for later, you can freeze the baked, cooled cookie bases without glaze or jam for up to a month. Once ready to serve, thaw and then glaze and assemble fresh to enjoy that fresh-baked taste and perfect texture.
Reheating
While shortbread cookies are best enjoyed at room temperature, if you prefer a warm cookie, gently warm them in a low oven (about 150°C/300°F) for 3 to 5 minutes. Avoid microwaving as it can soften the texture too much and affect the glaze setting.
FAQs
Can I use frozen strawberries for the puree?
Yes! Just thaw them completely and drain any excess liquid before mashing. Fresh or frozen, the puree will add a lovely color and flavor to your glaze.
What if I don’t have a heart-shaped cookie cutter?
No worries! You can use any cookie cutter shape you love, or even carefully cut out hearts with a knife for a rustic touch. The flavor will still shine just as brightly.
Can I substitute the strawberry jam with another flavor?
Absolutely! Raspberry or apricot jam can work beautifully too, offering different fruity notes while keeping the overall sweetness and texture intact.
Why do I need to chill the dough before baking?
Chilling firms up the butter in the dough, helping the cookies keep their shape while baking instead of spreading too much. It also improves texture, giving you that ideal crumbly shortbread feel.
How thick should I roll the dough for these cookies?
About ½ cm (¼ inch) thickness is perfect. This thickness ensures the cookies bake evenly with a buttery, tender center and a slight crisp on the edges.
Final Thoughts
I can’t recommend enough giving this Heart-Shaped Strawberry Shortbread Cookies Recipe a try—whether it’s for a cozy afternoon snack or a sweet surprise for someone special. These cookies combine buttery bliss with fresh strawberry brightness that will brighten anyone’s day. Once you make them, they’re sure to become one of your most beloved homemade treats!
“`
Print
Heart-Shaped Strawberry Shortbread Cookies Recipe
- Prep Time: 20 minutes
- Cook Time: 12 minutes
- Total Time: 32 minutes
- Yield: 12 servings
- Category: Dessert
- Method: Baking
- Cuisine: American
Description
Delight in these adorable heart-shaped strawberry shortbread cookies, featuring a buttery, tender base paired with a sweet strawberry glaze and jam filling. Perfect for special occasions or a charming afternoon treat, these cookies combine classic shortbread with a fresh fruity twist.
Ingredients
Shortbread Dough
- 125 g unsalted butter, room temperature
- 60 g caster sugar
- 1 teaspoon vanilla extract
- 180 g plain flour (all-purpose)
- ¼ teaspoon fine salt
Glaze
- 110 g powdered icing sugar (confectioners’ sugar)
- 2 tablespoon strawberry puree (from 2 large strawberries, hulled and mashed)
- 1 teaspoon unsalted butter, melted
- 30 ml milk (to adjust glaze consistency as needed)
Filling
- 170 g strawberry jam
Instructions
- Cream butter and sugar: In an electric mixer fitted with a paddle attachment, beat the unsalted butter, caster sugar, and vanilla extract on medium speed for 2 to 3 minutes until the mixture is pale and light. Scrape down the sides of the bowl halfway through to ensure even mixing.
- Combine flour and salt: Sift the plain flour into the bowl and add fine salt. Mix on low speed until the dough starts to form ragged clumps that clean the sides of the bowl. Use your hands to bring the dough together into a rough disc.
- Roll out the dough: On a lightly floured surface, roll the dough to about ½ cm (¼ inch) thickness. If the dough feels too soft and sticky, wrap it and chill in the refrigerator for 10 to 15 minutes to firm it up, making it easier to roll without cracking.
- Cut and chill cookies: Use a heart-shaped cookie cutter to stamp out cookie shapes. Place them on parchment-lined trays. Gently re-roll scraps as needed, adding a few drops of water if the dough dries out. Refrigerate all cutouts for at least 30 minutes to firm the butter, which helps maintain shape during baking.
- Bake cookies: Preheat the oven to 170°C (335°F). Bake the chilled cookies for 10 to 12 minutes or until the edges turn just golden. Let cookies cool on the baking tray for 10 minutes before transferring them to a wire rack to cool completely.
- Prepare glaze: In a bowl, combine the powdered icing sugar, strawberry puree, and melted butter. Mix until smooth and lump-free. If the glaze is too thick, microwave for up to 10 seconds or add small amounts of milk to reach the desired consistency.
- Glaze cookies: Separate cookies into equal halves for tops and bases. Dip the top halves into the strawberry glaze, letting excess drip off. Place glazed cookies on a wire rack or tray to set the glaze.
- Assemble cookies: Spoon or pipe about one teaspoon of strawberry jam onto each cookie base. Sandwich the glazed tops onto the jam bases and gently press together. Serve immediately or let rest at room temperature until the glaze and jam set for a more cohesive cookie.
Notes
- For best results, ensure butter is at room temperature before starting for easier creaming.
- Chilling the dough and cutouts prevents spreading and helps cookies keep their shape during baking.
- You can adjust the thickness of the glaze by adding more milk if it is too stiff, but avoid making it too runny.
- Store cookies in an airtight container at room temperature for up to 3 days.
- These cookies freeze well both before and after glazing; thaw completely before serving.


