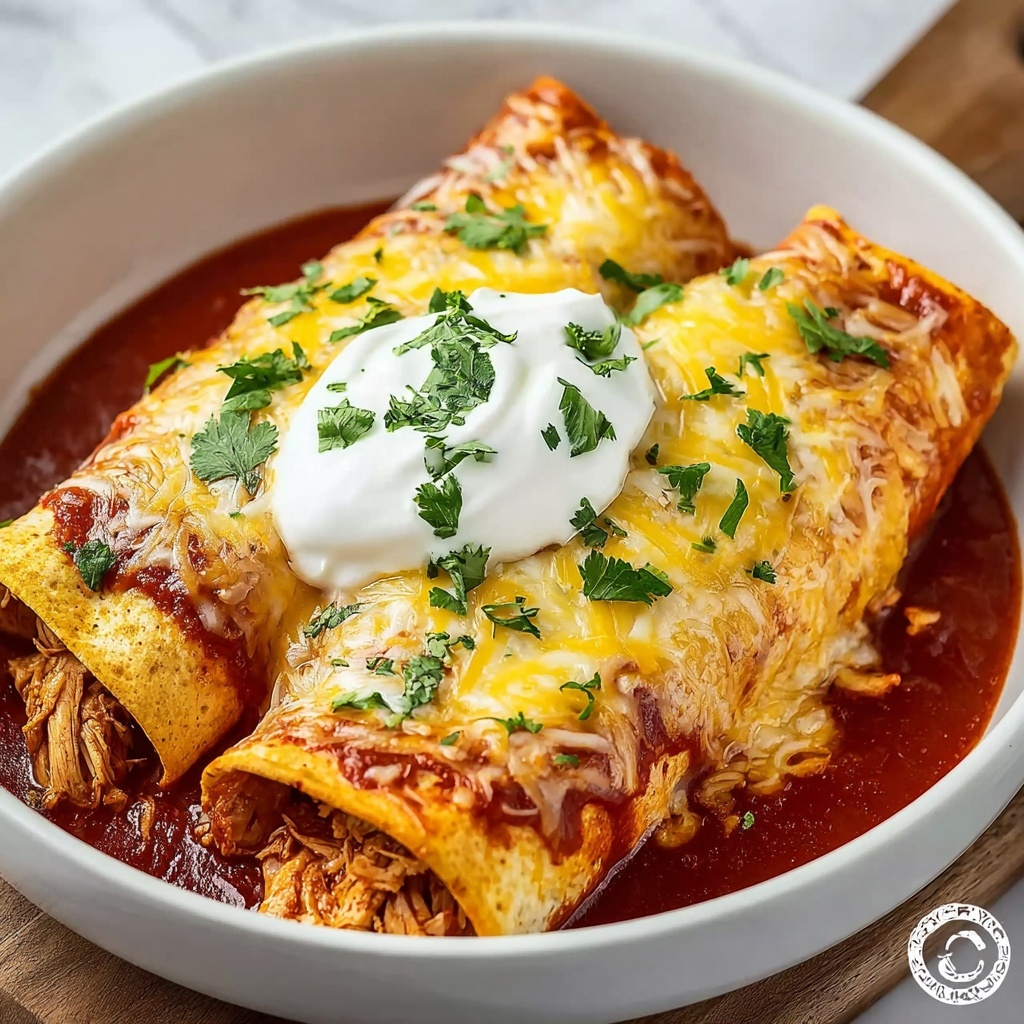
If you are craving a warm, comforting dinner that wraps up all the flavors of a festive Mexican feast into one cheesy, irresistible dish, let me introduce you to the Cheesy Chicken Enchiladas for Cozy January Nights Recipe. This recipe brings together tender shredded chicken, a velvety homemade chili sauce with a hint of dark chocolate, and layers of gooey melted cheese all nestled inside soft, lightly fried corn tortillas. It’s the perfect meal to curl up with when the January chill sets in, delivering hearty satisfaction and a touch of spice that feels like a cozy hug on a plate.
Ingredients You’ll Need
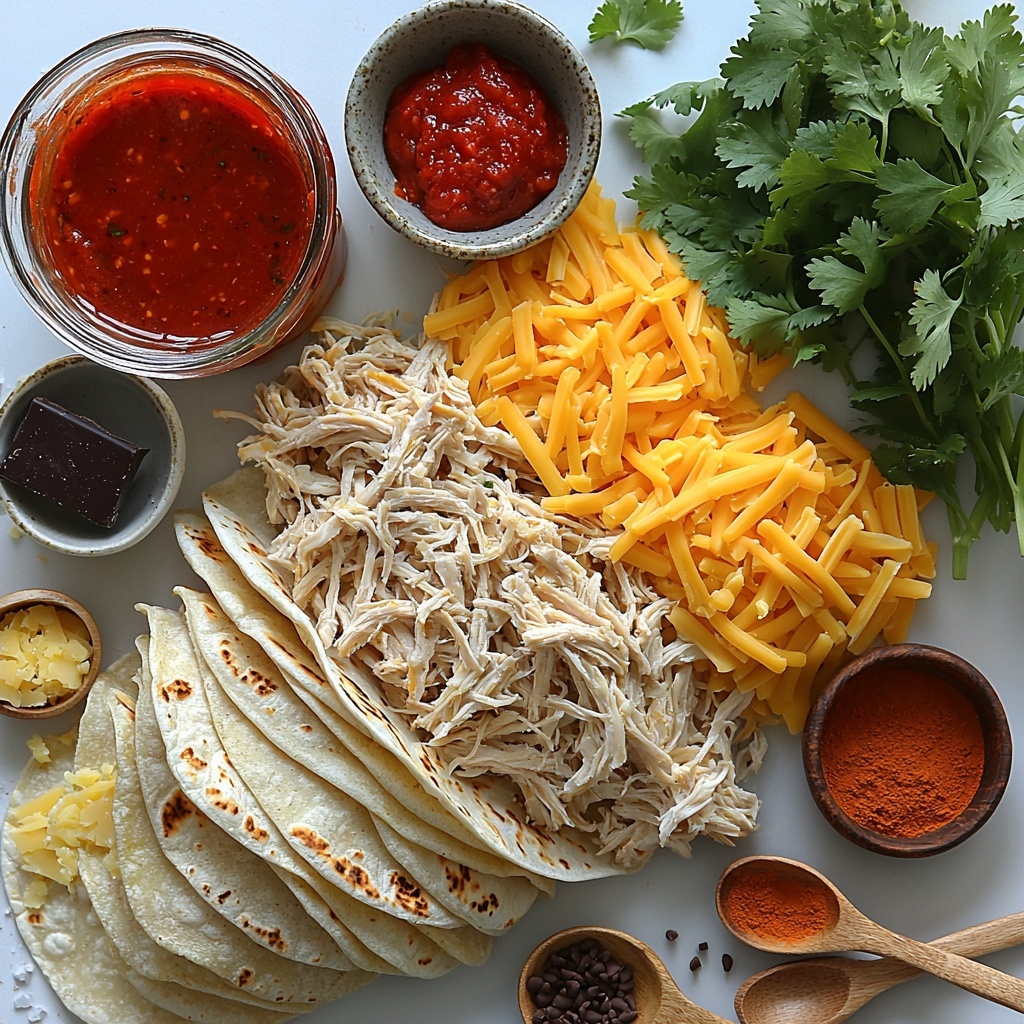
To make this dish truly shine, you only need simple, pantry-friendly ingredients that each bring something special to the table. From the smoky spices that build depth in the sauce, to the variety of cheeses that create that luscious, melty goodness, every component is thoughtfully chosen to create a balance of flavor, texture, and color.
- Shredded cooked chicken (3 cups): Using rotisserie chicken saves time and adds great flavor.
- Corn tortillas (12, 6-inch): These soft, slightly toasted tortillas create the perfect vessels for the filling.
- Monterey Jack cheese (2 cups, shredded, divided): A mild, creamy cheese that melts beautifully and keeps the enchiladas gooey.
- Sharp cheddar cheese (1 cup, shredded): Adds tangy richness and color contrast.
- Vegetable oil (3 tablespoons, divided): Used for frying tortillas and making the sauce smooth.
- All-purpose flour (3 tablespoons): Helps thicken the sauce to a silky texture.
- Chili powder (2 tablespoons): Packs a warm, smoky kick essential for authentic flavor.
- Ground cumin (1 teaspoon): Deepens the earthiness of the sauce.
- Garlic powder (1 teaspoon): A subtle punch of savory aroma.
- Smoked paprika (½ teaspoon): Adds a fragrant smokiness that rounds out the spices.
- Chicken broth (2 cups): Forms the flavorful base of the sauce.
- Tomato paste (3 tablespoons): Gives the sauce a rich, concentrated tomato flavor and vibrant color.
- Dark chocolate (½ oz square): A surprising ingredient that adds depth and balances the spice with subtle sweetness.
- Fresh cilantro (¼ cup, chopped): Adds a fresh, herbal brightness to the filling.
- Salt and pepper: Essential for seasoning and bringing all the flavors together.
How to Make Cheesy Chicken Enchiladas for Cozy January Nights Recipe
Step 1: Make the Sauce
Begin by heating 2 tablespoons of vegetable oil in a saucepan over medium heat. Whisk in the flour and cook for about one minute to create a roux that will thicken the sauce beautifully. Then, stir in the chili powder, cumin, garlic powder, and smoked paprika, letting the spices toast slightly to awaken their flavors. Gradually whisk in the chicken broth and tomato paste, simmering gently for 5 minutes until the sauce thickens to a luscious consistency. Finally, stir in the square of dark chocolate, allowing it to melt completely — this little addition elevates the sauce with a rich, complex note. Season the sauce with salt and pepper to taste and set it aside.
Step 2: Prep the Filling
In a mixing bowl, combine the shredded cooked chicken with 1 cup of Monterey Jack cheese and the fresh chopped cilantro. This combination keeps the filling moist, flavorful, and interesting with fresh herbaceous bursts. Season the mixture lightly with salt and pepper to enhance every bite.
Step 3: Fry the Tortillas
Heat the remaining tablespoon of vegetable oil in a skillet over medium heat. Briefly fry each corn tortilla for 10 seconds on each side until pliable but not crispy — this step prevents cracking when rolling and adds a subtle toasted flavor. Drain the tortillas on paper towels to remove excess oil.
Step 4: Preheat Oven and Prepare Baking Dish
Preheat your oven to 400 degrees Fahrenheit (about 200 Celsius) and lightly grease a 9×13-inch baking dish. This is where all your flavorful layers will come together and bake to melty perfection.
Step 5: Assemble the Enchiladas
Start by pouring half a cup of the chili chocolate sauce into the bottom of the baking dish — this helps prevent sticking and adds moisture from the very beginning. Dip each fried tortilla into the remaining sauce, then spoon in the chicken and cheese filling, rolling it tightly and placing each seam-side down in the dish. This method ensures each enchilada stays that way after baking and looks beautiful when served.
Step 6: Top and Bake
Once all the enchiladas are neatly lined up, pour the remaining sauce evenly over the top, then sprinkle the remaining Monterey Jack cheese and all the sharp cheddar cheese over everything. Cover the dish with foil and bake for 15 minutes to let the flavors meld and cheese melt. Remove the foil and bake an additional 10 minutes to achieve that gorgeous golden, bubbly cheese crust. Let the enchiladas rest for 5 minutes before serving so the layers set just right.
How to Serve Cheesy Chicken Enchiladas for Cozy January Nights Recipe
Garnishes
A sprinkle of fresh cilantro, a dollop of sour cream, or some thinly sliced green onions add a pop of color and freshness that beautifully contrasts the rich, melted cheese. For a little extra zing, try a squeeze of lime or some diced avocado on the side.
Side Dishes
Pair your cheesy chicken enchiladas with simple sides like Spanish rice, black beans, or a crisp green salad with a tangy vinaigrette. These sides create a balanced meal and enhance the comforting, homey vibe of the dish.
Creative Ways to Present
If you want to impress at a casual gathering or family dinner, serve the enchiladas on a rustic platter with extra sauce on the side for dipping. Alternatively, build individual servings in small ramekins topped with a sprinkle of cheese and broiled for a bubbly finish just before serving.
Make Ahead and Storage
Storing Leftovers
Store any leftover enchiladas tightly covered in the refrigerator for up to 3 days. Keeping them well-covered ensures the cheese stays moist and the flavors deepen overnight.
Freezing
This Cheesy Chicken Enchiladas for Cozy January Nights Recipe freezes beautifully. Assemble the enchiladas and wrap the baking dish tightly with plastic wrap and foil or transfer to an airtight container. Freeze for up to 2 months and bake from frozen, adding extra baking time to ensure they heat through.
Reheating
Reheat leftovers in a 350 degree Fahrenheit oven covered with foil until warmed through and the cheese is bubbly again. For a quicker option, a microwave works well—just cover with a damp paper towel to keep them moist and heat in short intervals.
FAQs
Can I use flour tortillas instead of corn?
Absolutely! Flour tortillas are softer and easier to roll if you prefer a less rustic texture. Just warm them to make rolling easier, though frying corn tortillas gives a more authentic flavor and texture.
Is the dark chocolate essential for the sauce?
While it might sound unusual, the dark chocolate adds a subtle richness that balances the chili’s spice and deepens the sauce’s flavor. If you don’t have any, you can skip it, but the sauce won’t be quite as complex.
Can I prepare this dish vegetarian?
Yes! You can substitute the chicken with sautéed vegetables, beans, or even shredded jackfruit for a vegetarian-friendly version while keeping the same cheesy, saucy magic.
How spicy is this recipe?
The heat level is mild to moderate, thanks to the chili powder and smoked paprika. You can adjust the spices to your preference or add a dash of hot sauce for extra kick.
Does frying the tortillas make the dish greasy?
Not at all, since you only briefly fry each tortilla just until pliable—not crispy. Excess oil is drained off on paper towels, keeping the dish perfectly moist without being oily.
Final Thoughts
I can’t recommend enough giving this Cheesy Chicken Enchiladas for Cozy January Nights Recipe a try. It’s one of those meals that wraps pleasure, heartiness, and a little touch of indulgence all in one irresistible package. Whether you’re feeding family during a chilly evening or impressing friends with your cozy cooking skills, this recipe hits every note just right. So grab your ingredients, and get ready to enjoy a comforting slice of cheesy, saucy bliss.
Print
Cheesy Chicken Enchiladas for Cozy January Nights Recipe
- Prep Time: 20 minutes
- Cook Time: 25 minutes
- Total Time: 45 minutes
- Yield: 6 servings
- Category: Dinner
- Method: Baking
- Cuisine: Mexican
Description
These Cheesy Chicken Enchiladas are the perfect warm and comforting meal for cold January nights. Packed with tender shredded chicken, a flavorful homemade enchilada sauce featuring smoky spices and a hint of dark chocolate, and topped with a melty blend of Monterey Jack and sharp cheddar cheeses, this recipe is sure to become a family favorite. Crispy fried tortillas filled with the savory chicken mixture are baked until bubbling and golden, delivering a deliciously cheesy and satisfying dish.
Ingredients
Filling
- 3 cups shredded cooked chicken (rotisserie works great)
- 1 cup shredded Monterey Jack cheese
- ¼ cup chopped fresh cilantro
- Salt and pepper to taste
Enchilada Sauce
- 3 tablespoons vegetable oil, divided
- 3 tablespoons all-purpose flour
- 2 tablespoons chili powder
- 1 teaspoon ground cumin
- 1 teaspoon garlic powder
- ½ teaspoon smoked paprika
- 2 cups chicken broth
- 3 tablespoons tomato paste
- 1 square (½ oz) dark chocolate
- Salt and pepper to taste
Others
- 12 corn tortillas (6-inch)
- 2 cups shredded Monterey Jack cheese, divided (1 cup for filling, 1 cup for topping)
- 1 cup shredded sharp cheddar cheese
Instructions
- Make the sauce: Heat 2 tablespoons of vegetable oil in a saucepan over medium heat. Whisk in the flour and cook for 1 minute to form a roux. Add chili powder, cumin, garlic powder, and smoked paprika, stirring to combine the spices. Gradually whisk in the chicken broth and tomato paste, then bring the mixture to a simmer. Cook for 5 minutes until the sauce thickens slightly. Stir in the dark chocolate square until melted and combined. Season with salt and pepper to taste, then set the sauce aside.
- Prep the filling: In a medium bowl, combine the shredded cooked chicken, 1 cup of Monterey Jack cheese, and chopped fresh cilantro. Season the mixture with salt and pepper and mix well.
- Fry tortillas: Heat the remaining 1 tablespoon of vegetable oil in a skillet over medium heat. Fry each corn tortilla for about 10 seconds on each side until they become pliable but not crispy. Drain the fried tortillas on paper towels to remove excess oil.
- Preheat oven: Set your oven to 400°F (200°C). Grease a 9×13-inch baking dish to prevent sticking.
- Assemble: Spread ½ cup of the enchilada sauce evenly in the bottom of the prepared baking dish. Dip each fried tortilla into the remaining sauce to coat, then fill with the chicken and cheese mixture. Roll the tortillas tightly and place them seam-side down in the baking dish.
- Top and bake: Pour the remaining enchilada sauce over the assembled tortillas. Sprinkle the remaining 1 cup of Monterey Jack cheese and 1 cup of sharp cheddar cheese evenly over the top. Cover the dish with aluminum foil and bake for 15 minutes. Remove the foil and continue baking for another 10 minutes, or until the cheese is golden and bubbly. Let the enchiladas rest for 5 minutes before serving to allow flavors to meld.
Notes
- Using rotisserie chicken saves time, but leftover cooked chicken works well too.
- Frying the tortillas briefly makes them pliable and prevents them from cracking when rolled.
- Dark chocolate adds a subtle richness and depth to the enchilada sauce—do not omit.
- Fresh cilantro adds brightness, but can be omitted if preferred.
- For a spicier kick, add some diced jalapeños to the filling or sauce.
- Leftovers can be refrigerated for up to 3 days and reheated in the oven for best results.


