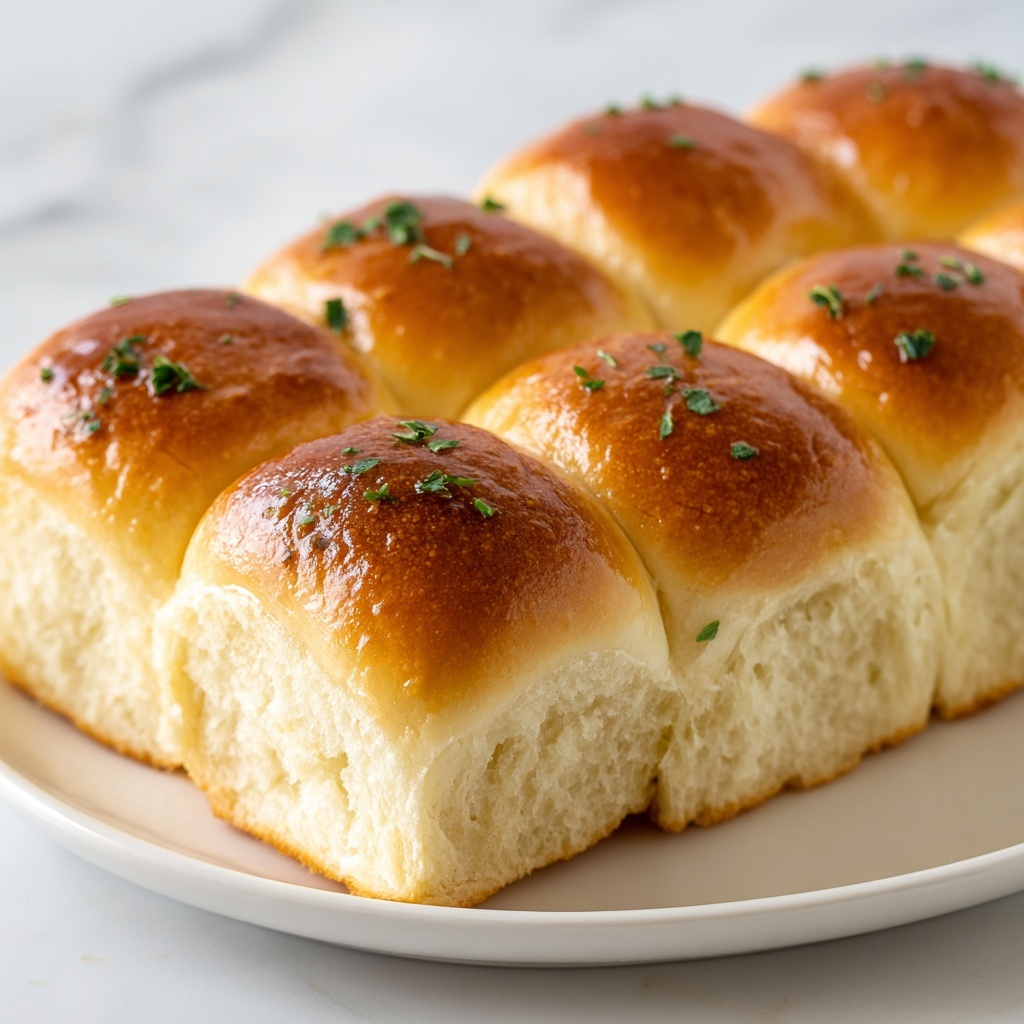
There is something incredibly comforting about warm, fluffy rolls fresh from the oven, especially when they are crafted to be inclusive for everyone’s dietary needs. This Dairy-Free Gluten-Free Dinner Rolls Recipe is a true game-changer for those avoiding gluten and dairy but unwilling to give up that soft, pillowy bread experience. Whether you’re hosting a holiday feast or simply craving a cozy homemade side, these rolls rise beautifully and deliver a tender crumb that is every bit as satisfying as traditional versions. I am so excited to share this recipe with you because it shows how simple ingredients can create rolls that taste amazing, without any dairy or gluten worries.
Ingredients You’ll Need
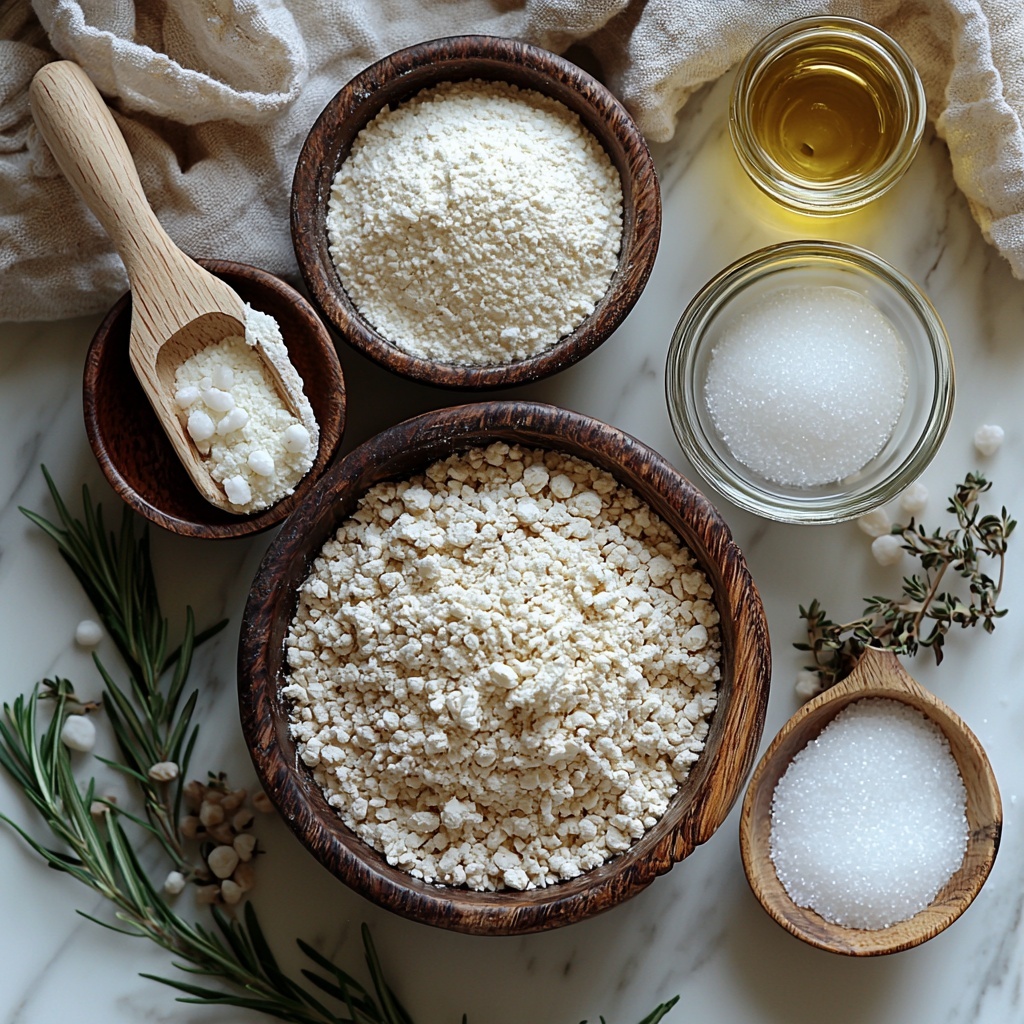
These ingredients are wonderfully simple, yet each one plays a critical role in creating the perfect texture, flavor, and rise for these special dinner rolls. From the gluten-free flour blend that forms the base to the yeast that gives a light, airy lift, every element is essential.
- 3 cups gluten-free all-purpose flour: The cornerstone of this recipe, providing structure and that classic roll texture.
- 2 ¼ teaspoons active dry yeast: This natural leavening agent ensures your rolls will rise beautifully and feel light.
- 1 teaspoon salt: Balances and enhances all the flavors in the dough.
- 1 teaspoon xanthan gum: Adds elasticity and chew, especially if your flour blend lacks it.
- 1 cup warm dairy-free milk (about 110°F): Activates the yeast while keeping the dough moist and tender.
- 2 teaspoons sugar: Feeds the yeast and adds a hint of sweetness to the final rolls.
- ¼ cup olive oil or melted coconut oil: Brings moisture and richness without dairy.
- 1 teaspoon apple cider vinegar: Helps tenderize the dough and improves the rise.
How to Make Dairy-Free Gluten-Free Dinner Rolls Recipe
Step 1: Activate the Yeast
Start by combining warm dairy-free milk, sugar, and active dry yeast in a small bowl. This mixture needs to sit for about 5 to 10 minutes, during which the yeast will froth and bubble to show it’s alive and ready to kickstart the dough’s rise. This step is key to ensuring your rolls fluff up perfectly.
Step 2: Prepare the Dry Ingredients
While the yeast activates, whisk together the gluten-free flour, salt, and xanthan gum in a large bowl. The xanthan gum works behind the scenes to mimic gluten’s stretchiness, making the texture more roll-like and less crumbly—truly a magic ingredient in dairy-free gluten-free baking.
Step 3: Combine Wet Ingredients
In a separate bowl, mix the frothy yeast mixture with olive oil and apple cider vinegar. This combination will not only add richness but also create the tender, moist quality these rolls are known for. Stir it well to get everything beautifully blended.
Step 4: Form the Dough
Pour the wet mixture into the dry ingredients and stir until you get a soft, sticky dough. It’s normal for gluten-free dough to be a bit tacky. If it feels too dry, just add dairy-free milk one tablespoon at a time—you want it just right for shaping.
Step 5: Shape the Rolls
Wet your hands to keep the dough from sticking and divide it into 12 even pieces. Gently shape each into a smooth ball and place them spaced apart on a parchment-lined baking tray. This even spacing allows them room to grow as they rise.
Step 6: Let the Dough Rise
Cover your rolls with a clean kitchen towel and set them somewhere warm. Over the next 30 to 45 minutes, you’ll witness them double in size, soft and puffy, thanks to that active yeast you carefully nurtured in step one.
Step 7: Preheat the Oven
As your rolls finish rising, preheat your oven to 375°F (190°C). Having the perfect temperature ready will ensure that immediate burst of heat needed to create a beautiful golden crust.
Step 8: Bake to Perfection
Before placing your rolls in the oven, you can brush their tops with a little olive oil or dairy-free butter for a gorgeous, shiny finish. Bake for 20 to 25 minutes until they are golden brown and irresistible.
Step 9: Cool and Enjoy
Once out of the oven, transfer the rolls to a wire rack and let them cool at least 10 minutes. This waiting time helps them set, but honestly, they’re still amazing warm and fresh. Serve and celebrate the deliciousness of your effort!
How to Serve Dairy-Free Gluten-Free Dinner Rolls Recipe
Garnishes
Enhance your rolls by brushing on a bit more olive oil or melted dairy-free butter right after baking for extra shine and flavor. Sprinkle a little flaky sea salt or fresh herbs like rosemary or thyme for a fragrant touch that complements their delicate crumb.
Side Dishes
These rolls are a perfect partner for hearty soups, savory stews, or vibrant salads. Think of them as little pillows ready to soak up rich gravies or to accompany a colorful roasted vegetable platter. Their mild flavor makes them incredibly versatile.
Creative Ways to Present
For special occasions, serve the rolls in a rustic basket lined with a linen napkin for a charming, homestyle vibe. You can also slice them in half and fill with dairy-free pesto or a zesty avocado spread, turning your rolls into delightful handheld bites.
Make Ahead and Storage
Storing Leftovers
If you find yourself with leftover rolls, store them in an airtight container at room temperature for up to two days. They stay soft and fresh, ready to enjoy as quick snacks or part of your next meal.
Freezing
You can freeze these rolls after baking by wrapping them tightly in plastic wrap and placing them in a freezer-safe bag. They keep wonderfully in the freezer for up to two months, so you can always have a comforting batch on hand whenever the craving strikes.
Reheating
To reheat, thaw frozen rolls overnight at room temperature, then warm them in the oven at 350°F (175°C) for about 10 minutes. This revives their softness and restores that just-baked warmth that makes every bite irresistible.
FAQs
Can I substitute the olive oil with another oil?
Absolutely! You can use melted coconut oil, avocado oil, or even a mild vegetable oil. Each will add a slightly different flavor but will maintain the moisture and tenderness of the rolls.
Do I have to use apple cider vinegar in this recipe?
Apple cider vinegar helps tenderize the dough and improve the rise, but if you don’t have it, you can substitute with lemon juice or white vinegar in equal amounts. It’s a small but important ingredient for the best texture.
What if my gluten-free flour blend already includes xanthan gum?
If your flour blend contains xanthan gum, you can skip adding extra here. Including too much can make the dough gummy, so it’s best to follow your blend’s instructions.
Can I make these rolls without using sugar?
Sugar feeds the yeast, so removing it can slow down the rising process. If you want to avoid sugar, you might try a small amount of maple syrup or honey as a substitute, but some sweetness is recommended for optimal rise.
How do I know when the rolls are fully risen before baking?
The dough should roughly double in size and look puffed up. A simple test: gently press a finger into one roll, and if the indentation slowly springs back, the dough is ready to bake.
Final Thoughts
Making these Dairy-Free Gluten-Free Dinner Rolls Recipe is such a rewarding kitchen adventure that brings warmth and joy to your table. They prove that dietary restrictions don’t mean missing out on comfort food pleasures. I truly hope you try this recipe soon and discover how effortlessly delicious and tender these rolls can be, making every meal feel just a little more special.
Print
Dairy-Free Gluten-Free Dinner Rolls Recipe
- Prep Time: 15 minutes
- Cook Time: 25 minutes
- Total Time: 40 minutes
- Yield: 12 rolls
- Category: Bread, Dinner Rolls
- Method: Baking
- Cuisine: American
- Diet: Gluten Free
Description
These delicious dairy-free and gluten-free dinner rolls are soft, fluffy, and perfect for any meal. Made with gluten-free all-purpose flour, dairy-free milk, and olive oil, these rolls are easy to prepare and rise wonderfully, providing a delightful texture and flavor without any dairy or gluten. Ideal for those with dietary restrictions who still want fresh, homemade bread rolls.
Ingredients
Dry Ingredients
- 3 cups gluten-free all-purpose flour
- 2 ¼ teaspoons active dry yeast
- 1 teaspoon salt
- 1 teaspoon xanthan gum (if not included in flour blend)
- 2 teaspoons sugar
Wet Ingredients
- 1 cup warm dairy-free milk (about 110°F)
- ¼ cup olive oil or melted coconut oil
- 1 teaspoon apple cider vinegar
Instructions
- Activate yeast: In a small bowl, combine 1 cup of warm dairy-free milk with 2 teaspoons of sugar and 2 ¼ teaspoons of active dry yeast. Let it sit for 5-10 minutes until frothy, indicating the yeast is active.
- Mix dry ingredients: In a large mixing bowl, whisk together 3 cups of gluten-free all-purpose flour, 1 teaspoon of salt, and 1 teaspoon of xanthan gum if your flour blend doesn’t already contain it. This ensures an even distribution of ingredients.
- Combine wet ingredients: In a separate bowl, mix the activated yeast mixture with ¼ cup of olive oil (or melted coconut oil) and 1 teaspoon of apple cider vinegar. Stir well to combine all liquids.
- Form dough: Pour the wet ingredients into the dry ingredients. Mix until a soft, sticky dough forms. If the dough feels too dry, add a little more dairy-free milk, one tablespoon at a time, to achieve the right consistency.
- Shape rolls: Using wet hands to prevent sticking, divide the dough into 12 equal portions and shape each portion into a ball. Place the shaped rolls on a parchment-lined baking sheet, ensuring space between each roll to allow for rising.
- Let rolls rise: Cover the rolls with a clean kitchen towel and let them rise in a warm place for about 30-45 minutes, until they have doubled in size.
- Preheat oven: While the rolls are rising, preheat your oven to 375°F (190°C) to ensure it is ready for baking.
- Bake rolls: Once risen, optionally brush the tops of the rolls with a little olive oil or dairy-free butter for a glossy finish. Bake for 20-25 minutes, or until the rolls are golden brown and sound hollow when tapped.
- Cool and serve: Remove from oven and let the rolls cool on a wire rack for at least 10 minutes before serving. Enjoy your fresh, dairy-free, gluten-free dinner rolls warm.
Notes
- If your gluten-free flour blend already contains xanthan gum, you can omit the added xanthan gum to avoid excess binding.
- Adjust the milk quantity slightly as needed; gluten-free flours can vary in absorption.
- Use warm (not hot) dairy-free milk to activate yeast properly without killing it.
- If desired, substitute olive oil with melted coconut oil for a subtle coconut flavor.
- For added flavor, sprinkle a little sea salt or herbs on top before baking.
- Rolls are best enjoyed fresh but can be stored in an airtight container for up to 2 days or frozen for longer storage.


