
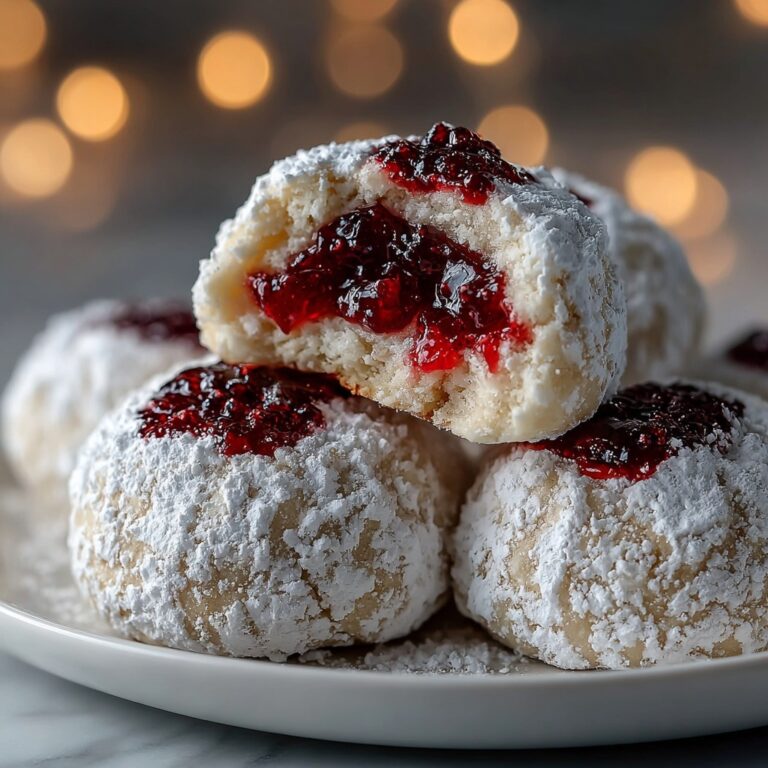
If you’re longing for a sweet that brings both nostalgia and a burst of festive flavors, the Old-Fashioned Martha Washington Candy Recipe is just what you need. This delightfully chewy and rich candy blends buttery sweetness with pecans, coconut, and cherries, all coated in luscious chocolate. It’s a timeless treat that evokes cozy holiday gatherings and warm memories, perfect for sharing or savoring one bite at a time. Once you try this Old-Fashioned Martha Washington Candy Recipe, it’s sure to become a cherished favorite in your candy-making repertoire.
Ingredients You’ll Need
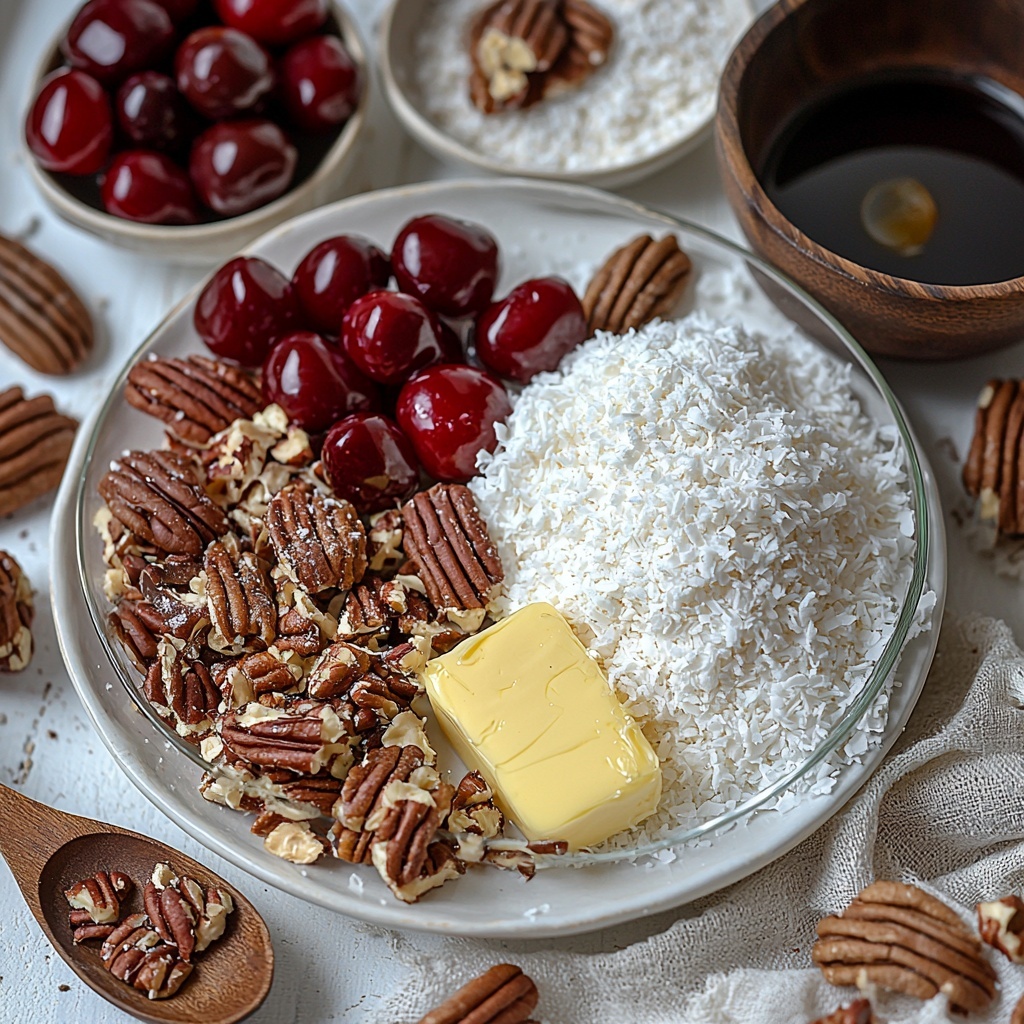
Gathering simple, pantry-friendly ingredients is the secret to creating the magic behind the Old-Fashioned Martha Washington Candy Recipe. Each component brings something special — from the creamy base to the bursts of crunch and chewy fruitiness, every ingredient plays an essential part in completing the candy’s classic character.
- Butter (0.5 cup, softened): Adds a rich creaminess that’s essential for the candy’s smooth texture.
- Sweetened condensed milk (14 ounces): Provides sweetness and helps bind the ingredients together for that chewy consistency.
- Powdered sugar (2 pounds): Crucial for sweetness and helps give the candy its structure and melt-in-your-mouth feel.
- Chopped pecans (2 cups): Offers a satisfying crunch and a nutty depth to balance the candy’s sweetness.
- Sweetened shredded coconut (1 cup): Imparts a chewy texture and subtle tropical flavor that complements the nuts beautifully.
- Maraschino cherries (10 ounces, drained and chopped): Adds bursts of bright, juicy flavor and a pop of color for visual appeal.
- Chocolate melting wafers (16 ounces): The silky chocolate coating that perfectly encases each candy ball.
- Coconut oil or shortening (1 tablespoon): Helps the chocolate melt smoothly and results in a flawless finish when coating the candies.
How to Make Old-Fashioned Martha Washington Candy Recipe
Step 1: Combine Butter and Sweetened Condensed Milk
Start by beating the softened butter with the sweetened condensed milk in a large bowl until the mixture becomes smooth and creamy. This creates the luscious base that will marry the sugar and add richness to the candy.
Step 2: Blend in Powdered Sugar
Gradually add the powdered sugar, mixing steadily until it is fully incorporated. This step is key because the powdered sugar gives the candy its signature body and sweetness, while ensuring everything sticks beautifully together.
Step 3: Fold in Pecans, Coconut, and Cherries
Now for the fun part — gently fold in the chopped pecans, shredded coconut, and maraschino cherries. Mixing these evenly means every bite will surprise you with crunch, chewy texture, and a burst of fruity sweetness.
Step 4: Chill Until Firm
Cover the mixture and pop it into the refrigerator for at least one hour. Chilling gives the mixture a chance to firm up so it’s easy to shape into perfect little candy balls.
Step 5: Shape and Freeze
Once firm, roll the mixture into 1-inch balls and arrange them on a parchment-lined baking sheet. Freeze them for another hour to solidify, which helps when it comes time to dip them in chocolate.
Step 6: Melt the Chocolate Coating
Gently melt the chocolate wafers along with the coconut oil or shortening in 30-second bursts, stirring between each until you have a smooth, glossy coating. This ensures your candies will have a beautiful and even chocolate shell.
Step 7: Dip and Set
Using a fork, dip each chilled candy ball into the melted chocolate, tapping off any excess. Place them back on parchment to set completely. This final step seals in the chewy, nutty center with a decadent chocolate layer that you’ll find irresistible.
How to Serve Old-Fashioned Martha Washington Candy Recipe
Garnishes
For an extra touch of flair, sprinkle some finely chopped pecans or shredded coconut on top of each chocolate-coated candy while the coating is still soft. This adds a lovely crunch and a rustic look that feels just right for this old-fashioned treat.
Side Dishes
The rich and sweet notes of Martha Washington candy pair wonderfully with a hot cup of coffee, tea, or even a glass of cold milk. Serving alongside fresh fruit or simple shortbread cookies can make your candy presentation feel like a charming dessert spread.
Creative Ways to Present
Wrap individual candies in wax paper or place them in mini cupcake liners for charming gift-giving or party favors. You can also arrange them on a festive platter lined with colorful doilies to really capture that nostalgic holiday feeling inspired by the Old-Fashioned Martha Washington Candy Recipe.
Make Ahead and Storage
Storing Leftovers
Store any leftover candies in an airtight container at room temperature or in the refrigerator if your home tends to be warm. They’ll stay fresh for up to two weeks, making them perfect for savoring throughout the holidays or sharing with friends and family.
Freezing
If you want to keep your Martha Washington candies longer, freezing is a great option. Place them in a single layer on a baking sheet to freeze, then transfer to a sealed container or freezer bag. They’ll keep well for up to three months without losing flavor or texture.
Reheating
Reheating isn’t usually necessary, but if your candy has been frozen, let it thaw at room temperature for an hour before serving. Avoid microwaving as it can soften the chocolate coating and change the texture of the candy.
FAQs
What makes the Old-Fashioned Martha Washington Candy Recipe unique?
This recipe blends a rich, buttery base with pecans, coconut, and maraschino cherries, all coated in a smooth chocolate shell. Its combination of textures and flavors makes it stand out among classic holiday candies.
Can I substitute nuts or skip them altogether?
Absolutely! While pecans provide iconic crunch and flavor, feel free to substitute with walnuts or almonds, or omit nuts if you prefer a nut-free treat. Just keep in mind that nuts add both texture and taste.
Is it necessary to freeze the candies before dipping in chocolate?
Yes, freezing the balls helps them firm up, making the dipping process neater and ensuring the chocolate coating sets nicely without melting or slipping off.
Can I use regular chocolate instead of chocolate melting wafers?
You can, but chocolate melting wafers are formulated to melt smoothly and harden with a shiny finish without tempering. If using regular chocolate, adding coconut oil helps achieve a similar effect.
How long do these candies last?
Stored properly, the candies last up to two weeks at room temperature and can be frozen for several months. Keeping them in airtight containers helps maintain freshness and texture.
Final Thoughts
Making the Old-Fashioned Martha Washington Candy Recipe is like taking a joyful trip back to a sweeter time, with every bite bursting with care and classic flavor. Whether you’re crafting these treats for your family gatherings or gifting them to friends, their timeless appeal never fails to delight. So go ahead, bring a little nostalgic magic into your kitchen and share this wonderful recipe that’s sure to become a lasting tradition.
Print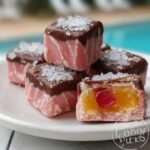
Old-Fashioned Martha Washington Candy Recipe
- Prep Time: 20 minutes
- Cook Time: 10 minutes
- Total Time: 1 hour 30 minutes
- Yield: 48 servings
- Category: Candy
- Method: No-Cook
- Cuisine: American
Description
This Old-Fashioned Martha Washington Candy recipe is a classic, nostalgic treat featuring a luscious mix of butter, sweetened condensed milk, powdered sugar, pecans, coconut, and maraschino cherries, all coated in rich melted chocolate. Perfectly sweet and chewy, these candies are rolled into bite-sized balls and chilled before being dipped in chocolate for a deliciously indulgent homemade confection.
Ingredients
Filling
- 0.5 cup butter, softened
- 14 ounces sweetened condensed milk
- 2 pounds powdered sugar
- 2 cups chopped pecans
- 1 cup sweetened shredded coconut
- 10 ounces maraschino cherries, drained and chopped
Chocolate Coating
- 16 ounces chocolate melting wafers
- 1 tablespoon coconut oil or shortening
Instructions
- Prepare the filling: In a large bowl, beat together 0.5 cup of softened butter and 14 ounces of sweetened condensed milk until smooth and creamy.
- Add powdered sugar: Gradually add 2 pounds of powdered sugar to the butter mixture, mixing thoroughly until fully incorporated and the dough is smooth.
- Mix in nuts and fruit: Fold in 2 cups of chopped pecans, 1 cup of sweetened shredded coconut, and 10 ounces of chopped maraschino cherries. Stir until the ingredients are evenly combined throughout the mixture.
- Chill the mixture: Cover the bowl with plastic wrap and refrigerate the mixture for at least 1 hour or until it becomes firm enough to handle.
- Shape the candies: Once chilled, roll the mixture into 1-inch balls and place them on a parchment-lined baking sheet. Freeze the balls for 1 hour to help them firm up further before dipping.
- Melt the chocolate: Melt 16 ounces of chocolate melting wafers with 1 tablespoon of coconut oil or shortening. Heat in 30-second intervals, stirring well between each interval until the chocolate is smooth and fully melted.
- Dip the candies: Using a fork, dip each frozen candy ball into the melted chocolate, ensuring it is fully coated. Tap off excess chocolate and place the coated candies back onto the parchment paper to set completely at room temperature or in the refrigerator.
Notes
- Make sure the maraschino cherries are well drained before chopping to prevent excess moisture in the candy.
- Using coconut oil or shortening in the chocolate helps achieve a smooth, shiny finish on the candy coating.
- Store the finished candies in an airtight container in the refrigerator to keep them fresh.
- These candies can be made ahead of time and stored for up to two weeks in the fridge or frozen for longer storage.

