Description
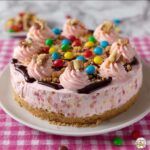
Indulge in the delightful Pink Paradise No Bake M&M Snickers Cheesecake, a decadent and visually stunning dessert that combines creamy pink cheesecake filling with crunchy Snickers bars and colorful M&M’s. This no-bake recipe features a buttery graham cracker crust and a fluffy, smooth cream cheese mixture enhanced with vanilla and a hint of almond extract, making it perfect for celebrations or any special occasion.
Ingredients
Scale
Crust
- 1 ¾ cups finely crushed graham cracker crumbs
- ½ cup (1 stick) unsalted butter, melted
- ¼ cup granulated sugar
Cheesecake Filling
- 2 (8-ounce) packages full-fat cream cheese, softened to room temperature
- 1 cup powdered sugar, sifted
- 1 teaspoon pure vanilla extract
- ½ teaspoon almond extract (optional)
- A few drops of pink food coloring
- 1 ½ cups cold heavy cream (at least 36% milk fat)
- 6 regular-sized Snickers bars (about 2 ounces each), chilled and coarsely chopped (reserve half a bar for topping)
- ¾ cup M&M’s Milk Chocolate Candies, chilled (reserve ¼ cup for topping)
Optional Toppings
- Additional ½ cup heavy cream, whipped with 1-2 tablespoons powdered sugar (for dollops)
- Drizzle of melted chocolate or caramel sauce
Instructions
- Prepare Crust: Finely crush graham crackers and melt unsalted butter. In a medium bowl, combine graham cracker crumbs, melted butter, and granulated sugar, mixing until the mixture resembles wet sand.
- Press Crust & Chill: Press the mixture firmly into the bottom of a 9-inch springform pan and slightly up the sides to create an even layer. Refrigerate for at least 30 minutes to allow the crust to firm up.
- Beat Cream Cheese: Using an electric mixer on medium speed, beat the softened cream cheese in a large bowl until very smooth and lump-free, approximately 2 to 3 minutes.
- Sweeten & Flavor: Gradually add sifted powdered sugar to the cream cheese, beating on low speed until fully incorporated and fluffy. Stir in pure vanilla extract and optional almond extract to enhance the flavor.
- Add Pink Hue: Mix in a few drops of pink food coloring gradually, until the cheesecake mixture achieves the desired soft pink hue.
- Whip Heavy Cream: In a separate cold bowl, whip the cold heavy cream starting on low speed and gradually increasing to high until stiff peaks form. Be careful not to over-whip to maintain smoothness.
- Fold for Fluffiness: Gently fold one-third of the whipped cream into the cream cheese mixture to lighten it. Then fold in the remaining whipped cream carefully with upward motions until fully combined and no white streaks remain, preserving the airy texture.
- Add Candies: Fold in the chilled, coarsely chopped Snickers bars and chilled M&M’s evenly throughout the cheesecake filling without deflating it.
- Assemble & Chill: Spoon the cheesecake filling evenly over the chilled graham cracker crust, smoothing the top with an offset spatula. Cover loosely with plastic wrap and refrigerate for at least 6 hours, preferably overnight, to fully set the cheesecake.
- Unmold & Decorate: Once firm, run a thin sharp knife around the edges to loosen the cheesecake from the pan. Remove the springform ring and transfer the cheesecake to a serving platter. Top with the reserved chopped Snickers pieces and M&M’s. Optionally, add whipped cream dollops or drizzle with melted chocolate or caramel sauce.
- Slice & Serve: For clean slices, warm a sharp knife under hot water and wipe dry before slicing. Cut into generous portions and serve immediately. Enjoy this luscious and colorful no-bake cheesecake treat!
Notes
- Ensure cream cheese is softened to room temperature to avoid lumps in the filling.
- Chill Snickers bars and M&M’s before folding them into the cheesecake to keep their texture intact.
- Use a cold bowl and cold heavy cream for whipping to achieve better volume and stiffness.
- If you prefer a stronger almond flavor, you may increase almond extract slightly, but use sparingly to avoid overpowering the vanilla.
- For best results, chill the cheesecake overnight to allow it to fully set and develop flavors.
- When slicing, warming and drying the knife between cuts creates cleaner slices and a prettier presentation.