
“`html
If you are craving a sweet treat that’s both indulgent and delightfully unique, the Red Velvet Cookie Cups Recipe is exactly what you need. Imagine the rich, velvety flavor of classic red velvet transformed into perfectly portioned cookie cups, each holding a creamy cream cheese frosting center that will melt in your mouth. These cookie cups blend the slightly fudgy texture of red velvet cake with the chewy satisfaction of a cookie, creating a dessert experience you’ll be excited to share with friends and family.
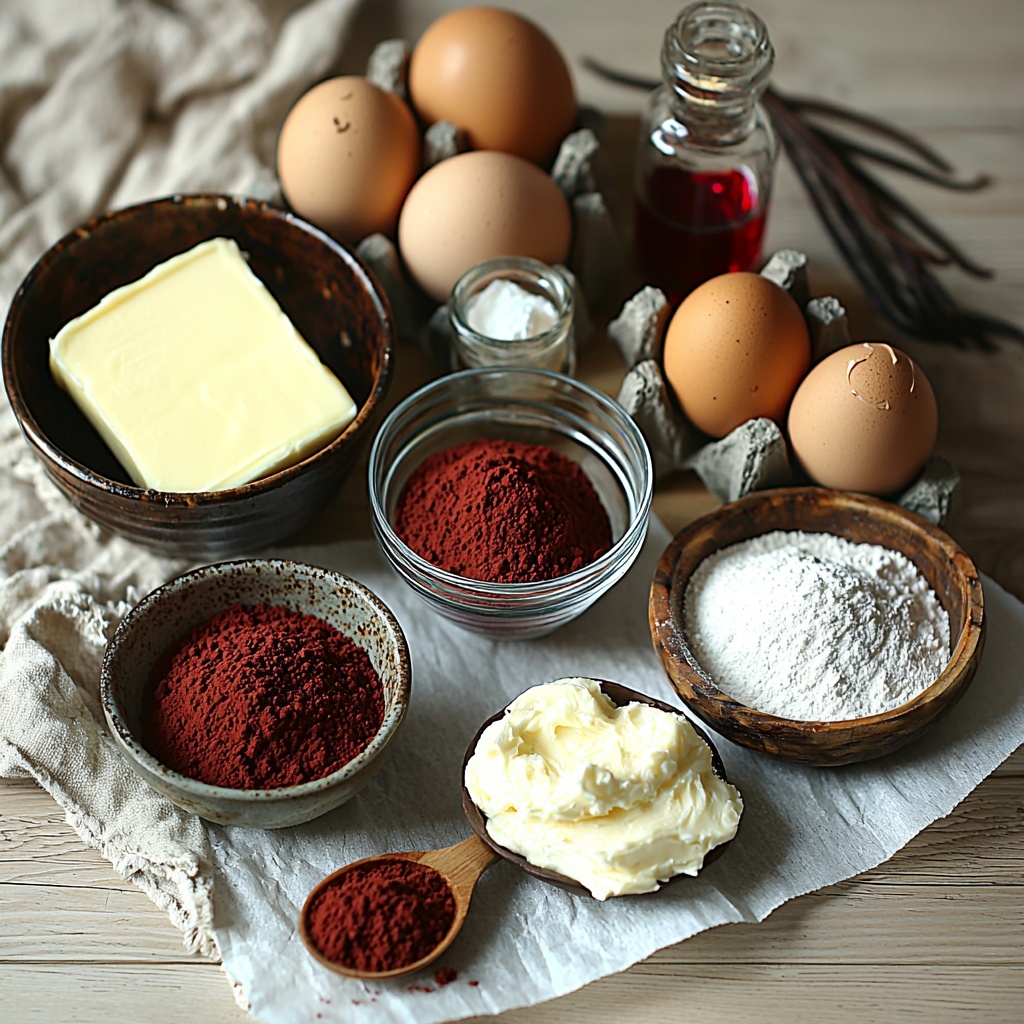
Ingredients You’ll Need
The magic behind this recipe lies in its straightforward yet essential ingredients. Each one plays a key role, from creating the tender cookie structure to delivering that signature red velvet flavor and luscious frosting.
- 1 cup unsalted butter, softened: Provides richness and a soft, chewy texture.
- 1 cup granulated sugar: Adds sweetness and helps with the cookie’s chewiness.
- 1 cup brown sugar, packed: Contributes moisture and a hint of caramel depth.
- 2 large eggs: Binds everything together and adds tenderness.
- 2 teaspoons vanilla extract: Enhances the overall flavor profile with warm notes.
- 2 1/2 cups all-purpose flour: The backbone of the dough, giving it structure.
- 1 tablespoon cocoa powder: Infuses that subtle chocolatey undertone essential to red velvet.
- 1 teaspoon baking soda: Helps the cookie rise and become light.
- 1 teaspoon salt: Balances the sweetness and intensifies flavors.
- 1 tablespoon red food coloring: Key for the vibrant, iconic red hue.
- 1 cup cream cheese, softened: Creates the smooth and tangy frosting filling.
- 1/2 cup powdered sugar: Sweetens the frosting while keeping it silky smooth.
- 1 teaspoon vanilla extract for frosting: Adds aromatic warmth to the creamy topping.
How to Make Red Velvet Cookie Cups Recipe
Step 1: Prepare Your Oven and Cream the Butter and Sugars
Start by preheating your oven to 350°F (175°C). This ensures it reaches the perfect temperature by the time your dough is ready. Next, cream together the softened unsalted butter with granulated sugar and brown sugar until the mixture is light and fluffy. This step is crucial because it incorporates air, giving your cookie cups a tender and delightful crumb.
Step 2: Add Eggs and Vanilla Extract
Once your butter and sugars are creamed, mix in the eggs and vanilla extract thoroughly. The eggs add moisture and act as a binding agent, while the vanilla extract adds a subtle but essential depth of flavor. Make sure these ingredients are well combined for the smoothest dough.
Step 3: Combine the Dry Ingredients
In a separate bowl, whisk together all-purpose flour, cocoa powder, baking soda, and salt. Combining these ingredients separately helps ensure even distribution throughout the dough and prevents clumps in your batter, which could affect the cookie cups’ texture.
Step 4: Mix Dry Ingredients Into Wet Ingredients and Add Red Food Coloring
Gradually add your dry mixture into the wet ingredients, stirring just enough to combine. Overmixing can make the cookies tough, so be gentle here. Then fold in the red food coloring until your dough achieves that gorgeous, vibrant red hue synonymous with red velvet.
Step 5: Shape and Bake
To achieve the perfect cookie cups, scoop the dough into a greased muffin tin, filling each cup evenly. This is what gives the cookie its iconic cup shape that will hold the delicious cream cheese frosting later on. Bake for 12 to 15 minutes until the edges are set but the centers remain soft.
Step 6: Prepare the Cream Cheese Frosting
While the cookie cups cool completely in the muffin tin, whisk together softened cream cheese, powdered sugar, and vanilla extract for the frosting. The frosting should be silky and smooth, providing a rich and tangy contrast to the sweet cookie cups.
Step 7: Frost Your Cookie Cups
Once completely cooled, pipe the cream cheese frosting into each cookie cup. This final touch not only looks gorgeous but also adds that irresistible creamy center that makes this treat stand out.
How to Serve Red Velvet Cookie Cups Recipe
Garnishes
For a delightful finishing touch, consider sprinkling some mini chocolate chips, white chocolate shavings, or a light dusting of cocoa powder on top of the cream cheese frosting. These add extra dimension to both taste and appearance, making your Red Velvet Cookie Cups Recipe even more irresistible.
Side Dishes
These cookie cups pair wonderfully with a glass of cold milk or a warm cup of coffee or tea. Their rich, sweet flavors balance perfectly with a simple beverage, making snack time or dessert feel extra cozy and satisfying.
Creative Ways to Present
For an impressive dessert display, arrange your cookie cups on a tiered cake stand or a festive platter adorned with fresh berries and mint leaves. You can also package them individually in clear boxes tied with a ribbon, making them perfect homemade gifts or party favors.
Make Ahead and Storage
Storing Leftovers
Once frosted, store your Red Velvet Cookie Cups Recipe in an airtight container in the refrigerator. They will stay fresh and delicious for 3 to 4 days, perfect for enjoying over a few cozy afternoons or sharing with guests.
Freezing
If you’d like to make these ahead for later enjoyment, freeze the unfrosted cookie cups in a single layer on a baking sheet first, then transfer them to a freezer-safe container or bag. They can be frozen for up to a month. When ready to eat, thaw them overnight in the refrigerator before frosting.
Reheating
To bring your cookie cups back to fresh-baked warmth, allow them to come to room temperature or gently warm them in the microwave for 10 to 15 seconds. Frost after warming to maintain the perfect creamy texture.
FAQs
Can I use a different type of frosting for the Red Velvet Cookie Cups Recipe?
Absolutely! While classic cream cheese frosting is traditional and delicious, you can experiment with buttercream, whipped cream, or even chocolate ganache to customize your cookie cups.
What if I don’t have red food coloring?
Red food coloring is key for that signature red velvet appearance, but you can substitute with natural alternatives like beet juice or powder. Just keep in mind that the color may be less vibrant, and a slight earthy flavor might sneak in.
Can I make these cookie cups gluten-free?
Yes, swapping out all-purpose flour for a gluten-free flour blend designed for baking works well. Just check for any adjustments recommended on the blend packaging to maintain the right texture.
Do I have to use cocoa powder in this recipe?
The cocoa powder adds a subtle chocolate depth that is essential for authentic red velvet flavor, so it’s best not to skip it. You can’t taste a strong chocolate flavor, but it balances the sweetness perfectly.
How do I prevent the cookie cups from sticking to the muffin tin?
Greasing the muffin tin well or lining it with silicone cups will make removing your Red Velvet Cookie Cups Recipe much easier and keep them intact. Letting them cool completely before removing also helps avoid breakage.
Final Thoughts
Making the Red Velvet Cookie Cups Recipe is truly a joyful experience, rewarding you with charming, delicious treats that look as good as they taste. Once you try these, they will quickly become one of your go-to desserts for parties, holidays, or just everyday indulgence. So, grab your ingredients, warm up that oven, and get ready to fall in love with cookie cups!
“`
Print
Red Velvet Cookie Cups Recipe
- Prep Time: 15 minutes
- Cook Time: 15 minutes
- Total Time: 30 minutes
- Yield: 24 cookie cups
- Category: Dessert
- Method: Baking
- Cuisine: American
Description
Delight in these luscious Red Velvet Cookie Cups, a festive and indulgent treat featuring rich red velvet cookie bases filled with creamy vanilla cream cheese frosting. Perfectly soft and moist with a subtle cocoa flavor, these cookie cups offer a delightful twist on classic cookies that are perfect for parties, holidays, or any craving for a sweet treat.
Ingredients
Cookie Dough
- 1 cup unsalted butter, softened
- 1 cup granulated sugar
- 1 cup brown sugar, packed
- 2 large eggs
- 2 teaspoons vanilla extract
- 2 1/2 cups all-purpose flour
- 1 tablespoon cocoa powder
- 1 teaspoon baking soda
- 1 teaspoon salt
- 1 tablespoon red food coloring
Cream Cheese Frosting
- 1 cup cream cheese, softened
- 1/2 cup powdered sugar
- 1 teaspoon vanilla extract
Instructions
- Preheat Oven: Preheat your oven to 350°F (175°C) to prepare for baking the cookie cups.
- Cream Butter and Sugars: In a mixing bowl, cream together the softened butter, granulated sugar, and brown sugar until light and fluffy to ensure a smooth dough.
- Add Eggs and Vanilla: Incorporate the eggs and vanilla extract into the butter-sugar mixture, mixing well to combine all ingredients thoroughly.
- Mix Dry Ingredients: In a separate bowl, whisk together the all-purpose flour, cocoa powder, baking soda, and salt to evenly distribute the dry components.
- Combine Wet and Dry Mixtures: Gradually add the dry ingredients to the wet mixture, mixing until just combined to avoid over-mixing which can toughen the dough.
- Add Red Food Coloring: Stir in the red food coloring until the dough reaches a uniform vibrant red color.
- Scoop Dough into Muffin Tin: Grease a muffin tin and scoop the cookie dough evenly into each cup, shaping if necessary.
- Bake: Place the muffin tin in the oven and bake for 12-15 minutes, or until the cookies are set and lightly spring back when touched.
- Cool Completely: Remove the muffin tin from the oven and allow the cookie cups to cool completely before frosting to ensure the frosting does not melt.
- Make Frosting: In a bowl, mix the softened cream cheese, powdered sugar, and vanilla extract until smooth and creamy for the filling.
- Pipe Frosting: Using a piping bag or spoon, fill each cooled cookie cup with the cream cheese frosting for a beautiful and delicious finish.
Notes
- Ensure butter and cream cheese are softened for easier mixing and smoother texture.
- Adjust the red food coloring to achieve desired color intensity.
- Do not overbake the cookie cups; they should be soft and moist inside.
- Allow baked cookie cups to cool fully before adding frosting to prevent melting.
- Use a piping bag for a more professional frosting look or simply spoon it in for a rustic style.


