
If you have a sweet tooth and adore the rich, nutty flavors of traditional Indian sweets, then you are in for a real treat with this recipe. Sweeten Your Day with Layered Pista Burfi Delight Recipe captures the essence of festive indulgence with its creamy mawa base, the delicate fragrance of elaichi, and the vibrant green pistachio layer that makes every bite a blissful experience. Layered pista burfi is not just a dessert; it’s a celebration of textures, colors, and tastes that melts lovingly on your tongue and brightens up any occasion.
Ingredients You’ll Need
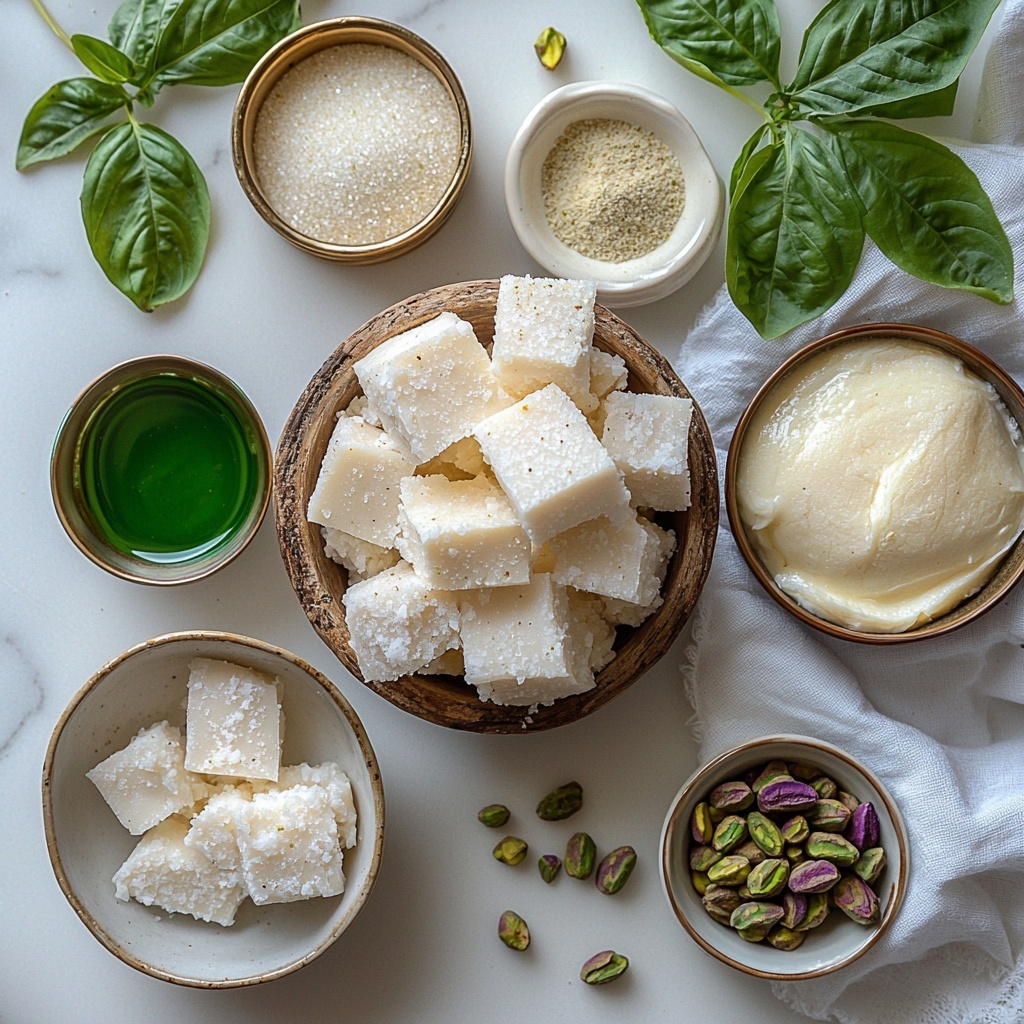
Keeping things simple yet delicious, the ingredients for this layered pista burfi come together beautifully to create a rich and textured sweet treat. Each component has its own role, from the creamy base of mawa to the subtle warmth of elaichi and the nutty crunch of pistachios. Here’s what you’ll gather for this delightful recipe:
- 2.5 cups Mawa: The creamy foundation of the burfi, giving it that melt-in-your-mouth richness.
- 3/4 cup Sugar (Superfine sugar recommended): Adds just the right amount of sweetness without graininess.
- 2 tablespoons Ghee: Enhances the texture and adds a luscious buttery flavor; unsalted butter works as a substitute.
- 1 teaspoon Elaichi Powder: Imparts a warm, aromatic hint, but feel free to skip if you prefer a milder taste.
- 2 cups Mawa: Used again for the pistachio layer to maintain smoothness while cooking.
- 1/2 cup Sugar (plus 2 tablespoons): Provides extra sweetness in the upper pista layer.
- 2 tablespoons Ghee: Adjust according to preference; essential for perfect consistency.
- 1/4 cup Crushed Pistachios: The star green nut, giving crunch and authenticity.
- Green Color: Choose natural coloring to keep the burfi wholesome and visually inviting.
- Additional Crushed Pistachios: For that final touch of garnish and extra nutty bite.
How to Make Sweeten Your Day with Layered Pista Burfi Delight Recipe
Step 1: Preparing the Creamy Base Layer
Start by crumbling 2.5 cups of mawa in a heavy-bottomed pan, adding 3/4 cup sugar, 2 tablespoons ghee, and the elaichi powder. Cook this mixture on medium-low heat while stirring continuously for about 15 to 20 minutes. You’ll notice it thickening into a soft dough-like consistency that’s smooth and fragrant – this will be the inviting base of your burfi.
Step 2: Setting the Base Layer
Once thickened, transfer your cooked mawa mixture onto a greased tray, spreading it evenly to create a smooth surface. Let this rest and cool down for approximately 40 minutes, allowing it to firm up just enough so it can carry the next luscious layer without losing shape.
Step 3: Crafting the Pistachio Layer
In a separate pot, combine the remaining 2 cups of mawa with 1/2 cup sugar plus an extra 2 tablespoons, and 2 tablespoons of ghee. Cook this gently, stirring until the mixture thickens to a similar consistency as the base. Stir in 1/4 cup of crushed pistachios and a pinch of green color to transform the mix into the beautiful green pista layer. This is where that gorgeous hue and nutty flavor come alive.
Step 4: Layering and Chilling
Carefully spread the pista mixture evenly over the cooled base layer, making sure to cover it smoothly. Cover the entire tray with cling wrap and pop it into the refrigerator for at least 6 to 8 hours, or better yet, overnight. This chilling step is crucial for the layers to set firmly and to let the flavors meld into that perfect sweet harmony.
Step 5: Serving the Sweeten Your Day with Layered Pista Burfi Delight Recipe
Once set, remove from the fridge and cut into beautiful squares or diamonds. Garnish with additional crushed pistachios if you like an extra crunch and nutty touch. Now, it’s ready to be enjoyed — each bite a celebration of creamy richness with a hint of cardamom and pistachio crunch.
How to Serve Sweeten Your Day with Layered Pista Burfi Delight Recipe
Garnishes
Sprinkling some extra crushed pistachios on top not only adds a lovely texture contrast but also makes your burfi look irresistible. You could also consider a light dusting of edible silver leaf for special occasions to give it a festive sparkle.
Side Dishes
This layered pista burfi pairs wonderfully with a cup of chai or cardamom-flavored coffee, enhancing the nutty and aromatic experience. Serve it alongside other mild sweets to balance the richness without overwhelming the palate.
Creative Ways to Present
Try cutting your burfi into different shapes like diamonds, rectangles, or stars to add a fun twist. Layer them on a colorful platter with fresh rose petals or edible flowers to make your Sweeten Your Day with Layered Pista Burfi Delight Recipe the centerpiece of any gathering.
Make Ahead and Storage
Storing Leftovers
If you’re lucky enough to have any leftovers, store your burfi in an airtight container in the refrigerator for up to a week. Keeping it chilled maintains its texture and flavor, ensuring each piece remains as delightful as when freshly made.
Freezing
You can freeze the layered pista burfi wrapped tightly in cling wrap and placed inside an airtight container. This extends the shelf life for a few weeks; just thaw it overnight in the fridge before serving to retain its luscious texture.
Reheating
Since burfi is best enjoyed chilled or at room temperature, reheating is not necessary. However, if you prefer it slightly softer, leave it out at room temperature for about 15-20 minutes before serving.
FAQs
Can I use store-bought mawa for this recipe?
Absolutely! Store-bought mawa works perfectly fine and can save you time, though homemade mawa often gives a fresher flavor. Either way, the burfi turns out delicious.
Is it necessary to use ghee, or can I substitute with butter?
Ghee adds a traditional aroma and richness to the burfi, but unsalted butter is a great substitute if you prefer. Just keep in mind that ghee has a higher smoke point and a distinct flavor.
Can I omit the elaichi powder if I don’t have it?
Yes, you can omit elaichi powder for a milder taste. The burfi will still be rich and flavorful from the mawa and pistachios.
How do I get that natural green color for the pista layer?
Using natural green food coloring or pistachio paste helps achieve that lovely hue. Avoid artificial dyes for a healthier, more authentic dessert.
What’s the best way to ensure the burfi layers set well?
Patience is key! Make sure each layer cools and firms up before adding the next, and always refrigerate the final assembled burfi for at least 6-8 hours or overnight for perfect setting.
Final Thoughts
If you’re looking to impress your friends or simply treat yourself to a truly special sweet, don’t hesitate to try the Sweeten Your Day with Layered Pista Burfi Delight Recipe. It’s one of those desserts that warms the heart and delights the senses, bringing the richness of traditional Indian flavors into your own kitchen with love and ease.
Print
Sweeten Your Day with Layered Pista Burfi Delight Recipe
- Prep Time: 15 minutes
- Cook Time: 35 minutes
- Total Time: 9 hours 10 minutes
- Yield: 12 servings
- Category: Dessert
- Method: Stovetop
- Cuisine: Indian
Description
Layered Pista Burfi is a rich and delightful Indian sweet made from mawa, sugar, ghee, and pistachios, layered to create a beautiful, flavorful treat perfect for festivals and celebrations. This recipe combines a creamy base with a vibrant pistachio topping, offering a melt-in-the-mouth texture balanced with aromatic elaichi and natural green coloring.
Ingredients
Base Layer
- 2.5 cups Mawa (Can be made at home or purchased)
- 3/4 cup Superfine Sugar
- 2 tablespoons Ghee (Unsalted butter can be used as a substitute)
- 1 teaspoon Elaichi Powder (Cardamom powder, optional for milder taste)
Top Layer
- 2 cups Mawa (Ensure a smooth texture when cooking)
- 1/2 cup Sugar plus 2 tablespoons (for additional sweetness)
- 2 tablespoons Ghee (Adjust quantity to preference)
- 1/4 cup Crushed Pistachios (Traditional pistachios recommended)
- Natural Green Color (Optional, for authentic color)
Garnishing
- Additional Crushed Pistachios
Instructions
- Prepare Base Layer: Crumble 2.5 cups of mawa into a heavy-bottomed pan. Add 3/4 cup superfine sugar, 2 tablespoons ghee, and 1 teaspoon elaichi powder. Cook the mixture over medium-low heat for 15-20 minutes, stirring continuously until it thickens into a soft dough-like consistency.
- Set Base Layer: Transfer the cooked base mixture to a greased tray and spread it evenly. Allow it to cool and set for about 40 minutes to firm up, providing a sturdy foundation for the top layer.
- Prepare Pistachio Layer: In a separate pot, combine 2 cups mawa, 1/2 cup sugar plus 2 additional tablespoons, and 2 tablespoons ghee. Cook over medium heat, stirring frequently, until thickened similarly to the base layer. Stir in 1/4 cup crushed pistachios and a pinch of natural green color to enhance appearance and flavor.
- Assemble Layers: Once the pista mixture is ready, carefully spoon and spread it uniformly over the cooled base layer. Cover the layered burfi with cling wrap to avoid drying and help it set properly.
- Refrigerate: Place the assembled burfi in the refrigerator for at least 6-8 hours, preferably overnight, to achieve the perfect firmness necessary for cutting and serving.
- Serve and Store: Cut the set burfi into squares or diamonds using a sharp knife. Garnish with additional crushed pistachios as desired. Store any leftovers in an airtight container for up to one week to maintain freshness and flavor.
Notes
- Use a heavy-bottomed pan to prevent burning and ensure even cooking of the mawa mixture.
- Adjust the ghee amount slightly if you prefer a richer or lighter texture.
- If natural green color is not available, you may omit it or use a small amount of food-grade coloring.
- Allow each layer to cool and set properly for clean and neat layering.
- Use superfine sugar for quicker dissolution and smoother texture in the burfi.

